PS Wood Machines 21″ Scroll Saw

A few weeks ago my wife and I went down to Louisville, KY for the day. There’s a new antique mall where we live called the Peddler’s Mall and noticed that there were several more of them in Louisville. So we figured we’d make a day of it and check out the malls down there. Well, the trip was nearly a waste of time as most of the stuff that was for sale in all of the Peddler’s Mall were junk. Nearly every booth was a bunch of yard sale crap where people would try to sell things like Scooby Doo drinking glasses for a buck.

Near the end of the day, I strolled down the aisle and caught my eye on an old scroll saw for $99.00. The saw was sitting on its stand in the back of the booth and had duct tape wrapped around it. I checked it over for a second and looked at Anita. She looked back at me and asked “what are you going to do with that thing?” I didn’t have an answer as I wasn’t in the market for a new scroll saw. So we left the mall and drove back home.

On my way back home I couldn’t get the saw out of my mind. I really didn’t need a new scroll saw as I don’t do all that much scrolling, but I have always longed to own a Hegner. Out of curiosity, I pulled up eBay on my phone and typed in “PS Wood 21″ scroll saw” and saw that used ones sell for $400. Ugh, I should have bought it!

A couple of weeks go by and my boss asked to do some market research in Louisville. The rep for Louisville, knew I was coming down to help him out with the research, so he asked if I wanted to have lunch with him at his favorite Chinese buffet. It sounded good to me, so he gave me the address. As soon as I pulled into the parking lot of the buffet, low and behold, the Peddler’s Mall with the scroll saw was right across the street. I told myself that after lunch that I was going back in to see if the saw was still there.

I walked into the store and went back to the booth. Luckily it was still sitting there for $99.00. I checked over the saw again and it seemed like everything was there. The only thing that it needed was a new diaphragm for the blower and a new belt. I asked a worker if there was anyway I could plug it in to see if the motor worked. She told me that there was an outlet up by the registers, so I picked up the saw and carried it all the way to the front of the store. I had to unwrap the duct tape that was holding the arms down so that they could move. As soon as I turned the switch on the saw worked just fine. Happily, I bought the saw and shoved it into my car.

blog

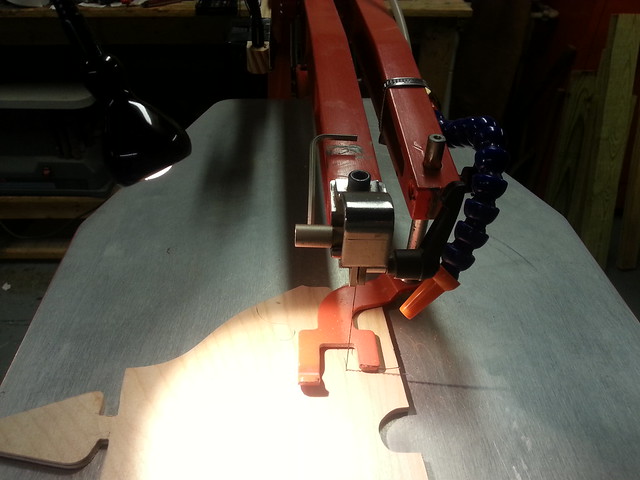
After cleaning the saw up a little bit, it worked fine. I bought the new blower and belt along with a selection of scroll saw blades to make the saw perform better. Now I wanted to snazz it up a little bit by adding a light to it so I could see what I was cutting. I ended up buying a cheap clamp-on light from Ikea for $15.00.

I needed a way for the light to hold onto the saw. I tapped the two holes on the left side arm and threaded a couple of screws into them to hold a wooden arm.

I wanted the light to have a cleaner look rather than just have it clamp onto a wooden arm. I drilled a hole through the top of the arm to be able to feed the wire of the light through.

blog

I carefully removed the clamp portion of the light and spliced the wire to feed it through the hole. I used electrical tape to re-attach the wires and hold everything onto the arm. I guess I could have painted the arm black for style points, but no one will probably see the saw other than me.

The light turned out well as it’s a much better scrolling with proper lighting. I’ll be using this saw for decades and loving it.

blog

What Do You Think of this Style of Furniture?

Having a woodworking blog, I know that a lot of people who follow me are also woodworkers. And if I know woodworkers, it is that they love wood grain. So much so, that the whole idea of painting a piece of furniture that they make is often considered sacrilegious. However, I also know that many women who usually buy furniture for their home would rather have a piece of furniture that goes with their décor. Beautiful wood grain is something many of them don’t even think about when picking out a piece. So I decided to do a little nonscientific poll to see what people think of the following piece of furniture.

This is a buffet my wife bought at an auction. She wanted to paint the base, but leave the top a natural wood tone. She sanded the top and oiled it with hemp oil. Some people call this type of furniture restyle Shabby Chic. I’m not sure if this is technically Shabby Chic or French Country or whatever. My wife calls it Elegant Farm House style.

Below you can see some of the detail of the wood after it’s been painted. To me, the architectural details of the moldings stick out a little more and are not muddled in the wood grain when the piece has been distressed. But what do you think?

http://i1207.photobucket.com/albums/bb475/mvflaim/buffet-1.jpg?t=1396789538

Please feel free to Share this post. The more people who see it and vote, the better.

Making a Farm House Table

My wife Anita was getting ready for a design show she was doing called Over the Moon in Lawrenceburg, IN. She asked me to make a farm house table from basic 2 x 8’s I bought from Lowe’s. So I bought the wood and laid out the boards on the floor to see how big of a table she wanted. We ended up deciding on a table that was around 3′ x 5′.

When I bought the lumber, I chose boards with the straightest grain possible with very little or no knots. However, most of the boards I chose were still high in moisture content so I had to let them acclimate in my shop so they could dry out a little bit.

After milling the boards to one inch thick, I stickered them on the floor and placed a fan near them to help the boards dry out a bit. I placed weights on the top board just to prevent it from cupping. The paper towel underneath the weight is to prevent the iron of the weight staining the wood.

After about a week, the boards were down to a workable moisture content. You wouldn’t think that simply laying boards down for a week would change the moisture content that much, but it did.

Anita already bought legs at an antique show back in the fall for about $10.00. All I had to do was make the frame and top and assemble it all together. I used a 3/8″ beading molding plane to put a bead on the sides of the table to give it a bit of detail.

It doesn’t get much simpler than this. I used pocket screws to attach everything together. The idea of a farm table is keep the joinery simple.

Anita stained the top with gel stain and painted the base with chalk paint. The table was too wide to get through my basement door so I had to finish it in the living room.

I asked Anita if she wanted me to attach the boards from the bottom so the fasteners wouldn’t show. She told me no. She said “just screw down the boards and fill in the holes with plugs”. So I did just that leaving about a 1/8″ gap between the boards for expansion and contraction of the wood. After I was done, Anita sanded the top again with 220 grit sand paper and reapplied some more stain.

This is how the table looked when it was done and ready for the show. Anita applied a dark wax to the paint to highlight the details of the legs. She also waxed the top to give it some luster.

You can see some of the dark wax detail here.

Anita posted this picture of the table on her Facebook account right before the show started. One of her followers saw the picture and private messaged her asking Anita to hold the table, however Anita never saw her message. When the show opened, the young woman ran to her booth and asked if the table was still available. Anita said it was and the woman bought it right on the spot. It’s nice to know someone likes my work. haha.