The Furniture Makers of Cincinnati 1790 to 1849

While shopping around a couple of antique stores in Lebanon, OH this weekend, I ran across this book placed on the bottom shelf of a bookcase in the back corner of the store. The book was “The Furniture Makers of Cincinnati 1790 to 1849” and it intrigued me since it was something that I was looking for a while. I have always known that back in the earlier 1800’s Cincinnati was the epicenter of the furniture industry, but I knew very little about any of the makers or furniture from that time.

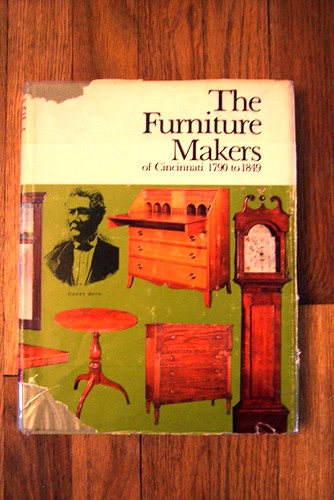
The writer of the book Jane E. Sikes, who I can only imagine was Richard Gere’s mom, was a native Cincinnatian who held degrees from Bennett College and the University of Cincinnati. She researched and documented hundreds of cabinet makers, chair makers and turners during the earlier part of the 19th century and included their name, location, and year or years in which they operated in alphabetical order. She also wrote about the furniture industry in Cincinnati and the artisans who helped carve its future. If you’re from Cincinnati and would like to read the book yourself, you can buy a used copy on Amazon. http://www.amazon.com/Furniture-Makers-Cincinnati-1790-1849/dp/B002H2TIDE/ref=sr_1_1?ie=UTF8&qid=1376267859&sr=8-1&keywords=the+furniture+makers+of+cincinnati

During the earlier 1800’s, Cincinnati was the fifth largest city in the US and the largest in the West. Steamboats carried goods from the East and to New Orleans. Being a major port for travelers on the their way out west, Cincinnati flourished economically and by 1815, Cincinnati was exporting chairs and furniture out west, selling to the steamboat trade. Because of the expanding growth and the lush local forests, artisans from all over the world came to Cincinnati to help build the furniture that was in such heavy demand.

The book has a few pages of color plates showing furniture made in Cincinnati which is what I was really after.  Being a furniture maker from Cincinnati, I’d like to pay homage to the furniture makers before me by incorporating some of their shared styles into my own designs. Anytime I watch the Antiques Roadshow on PBS, I hear the Keno brothers talk about the Philadelphia style or New York style of furniture, but never hear them speak of a Cincinnati style of furniture. Unfortunately, there doesn’t appear to be any singular design that stands out as a Cincinnatian form as Sikes wrote, “It is difficult to attribute particular characteristics to Ohio furniture in general and Cincinnati in particular. However, there are certain pieces which have descended lineally in certain families and we know that these shapes are definitely the kind of furniture made here in 1820 and 1830.” However, she doesn’t go into detail what those shapes or pieces were.

As far as the furniture industry in Cincinnati is concerned, unfortunately, the Great Flood of 1832 wiped out a lot of the furniture makers who worked and lived downtown. The river was so high that year that it was reported by William Henry Harrison that steamboats were travelling down city streets. Seven of the major chair makers were decimated as all of their tools and paint were washed away down stream. After the flood in 1834, the sudden outbreak of Asian Cholera only added to their woes when as many as 100 people died a day from the illness. Steamboats weary of traveling to Cincinnati in fears of spreading the disease bypassed the city thwarting once again the chair makers who depended on the steamboat trade. Most of them closed up shop and went onto other trades.

While examining the pictures, I think there are some similarities in the curves of the pieces that I can incorporate in my own designs in the future. Since I have lived in Cincinnati for nearly thirty years, it only makes sense to continue the proud history of furniture makers who came before me.

Page 20 has a picture of the Book of Prices of the United Society of Journeymen Cabinet Makers of Cincinnati for the Manufacture of Cabinet Ware in 1836. Books like these were legal contracts for helping unionize furniture making. Whether or not they were adhered to is anyones guess.

One of the neatest furniture makers Sikes researched was an African-American man named Henry Boyd who was born into slavery in Kentucky on May 14, 1802 and then bought his freedom at the age of eighteen. He set up shop in Cincinnati and sold his furniture to people all over the South and Southwest. He began working in 1830 and by 1850 he employed 20 cabinet makers making beds for hotels. Some of his furniture can still be seen today at the Golden Lamb Inn, the oldest hotel and restaurant in Ohio in the city of Lebanon, just two doors down from where I bought the book. I have never eaten at the Golden Lamb but I’ve heard good things about the place. Looks like I’ll have to take my wife there soon and check out some of his furniture if possible. The Cincinnati Enquirer wrote an article about Henry Boyd a few years back. http://www.enquirer.com/editions/1997/02/21/loc_blackhistory.html

Somebody who owned the book before me was doing some research as there were still a couple of hand written notes tucked inside. This is definitely a great book that I will own for a long time. Maybe I’ll add my own notes to the book someday doing research on some Cincinnati furniture makers.

Empire Dresser Veneer Repair

I’ve been working the past couple of weekends on an old empire dresser my wife bought at an auction a couple of months ago. After we got the dresser home, we noticed that the dresser had some old repairs on it. It also had a poor stain job that looked like it was sprayed on with a paint sprayer since it was covered in orange peel. So I stripped off all of the stain with Soy Gel paint stripper and wanted to fix some the repairs.

At the top of the dresser was this veneer repair. What the original guy who repaired the dresser was trying to accomplish I’m not sure, but I believe that what was underneath this veneer at one time was a lock mechanism to lock the top drawer. The lock was long gone and we had no intentions of adding the lock back in, so I decided to fix this area of the dresser with a new piece of veneer.

The original veneer on the dresser was made from a piece of crotch mahogany. I didn’t have any mahogany veneer on me so I decided to fill it with a small piece of sapele. Sapele is often considered a poor man’s mahogany being about half the cost. Plus I really didn’t feel like buying an expensive piece of mahogany to fix this little area. The good thing about this repair is that it was dead center of the case so any new repair would still be symmetrical on both sides even if it didn’t match perfectly with the rest of the dresser.

I used a card scraper and ran a utility knife down the scraper scoring the veneer. I then pared away the rest with a paring chisel. After all the wood was removed, I flattened out the rest of the area as best I could so the new piece of veneer would sit flat.

After measuring the area, I cut a new piece of sapele from a scrap board and dried fitted in place. I gently planed across the face to level it with the rest of the veneer making sure I didn’t cut into the old veneer. After everything fit, I glued and clamped it to the dresser.

The piece fit but I wanted to match the color of the original mahogany veneer. I took another scrap piece of sapele and experimented with a few colors of water soluble dyes to see how well I could match it up to the original veneer. After a few attempts, I decided to use a couple of coats of Early Brown American dye with a very light coat of Mahogany stain.

The color turned out well. Not a perfect match but well enough. Once I get the drawers done, my wife will apply a few coats of hemp oil to bring out the natural beauty of the wood. I’ll post a picture when the dresser is done.

Is Wood Magazine Going Shabby Chic?

I received the latest issue of Wood magazine yesterday and noticed a project on the cover that I had seen before but with a different twist. They showed an entry bench made from an oak door. I recognized the project because I’ve seen it done a few times before but only with an old door that was repainted.

The style is called shabby chic and is very popular among women. The idea is to take old items, commonly referred to as “junk”, and repurpose them into modern hip accessories or furniture for your home. There are thousands of websites and blogs as well as a number of magazines that focus on the shabby chic style. There are even a couple of TV shows where the hosts’ buy old items and use them as design elements around the home. Below are some old shabby chic doors repurposed into benches.


This one is very similar to Wood magazine’s cover photo.

I know all about the shabby chic style from wife Anita. She has a business called Bella Chic Decor where she finds old pieces of furniture and paints them with chalk paint to give them an old worn look. Sometimes she’ll ask me to repurpose an item she bought into something more useful. In fact, I wrote a blog about repurposing an old door into a headboard a few months ago.

https://mvflaim.wordpress.com/2012/07/10/turning-a-headboard-into-a-bed/

I don’t have any problem with shabby chic stuff even though it’s really not my cup of tea as it tends to be very femine. You may not be crazy about it either, but chances are your wife, sister, or daughter probably likes it. It’s all the rage these days and offers a cheap alternative from buying mass-produced laminated press board crap that you’ll find in retail stores. Often old antique furniture is solidly built, but just needs to be updated a little bit to fit with the modern decor of homes.

When my wife saw the cover of the magazine she asked, “why didn’t they just use an old door”? That’s a good question. The editors at Wood magazine estimated the cost of building the bench at $375. One could buy an old door on Craigslist for about $20.00, use poplar hardwood and birch plywood to build the sides, paint everything a neutral color, and end up spending about $100 for nearly the same look.

I can imagine the editors of Wood magazine sitting around in a meeting room asking each other if they should just use an old door and paint it. They probably realized that woodworkers love wood grain and consider painted furniture sacrilege. In fact in the first paragraph of the article, they mention that one could make this project using an old door from a salvage yard. It’s just a shame that they didn’t show a picture of a bench made from an old door to give the reader an idea of how it looks.

A $6.00 Side Table

This is the side table I just made last week painted and all finished. My wife painted it with chalk paint and added a stencil to to the top. I think it turned out really well. It was made with from a 2×8 southern yellow pine board I bought from Lowe’s for $6.00. We plan on giving it away to our local PBS station so they can auction it off in their annual pledge drive Action Auction next month. We’re going to split the donation; I as the builder, MVFlaim Furnituremaker and my wife Anita as the painter, Bella Chic Decor. It’ll be intersting to see how it does.

Making a Shaker Table from a 2×8

Earlier this week I grabbed a 2×8 that was 8 feet long for $6.00 at Lowe’s with the intentions of making a shaker table out of it. I’ve made a lot of furniture out of Southern Yellow Pine dimensional lumber over the past couple of years. One of the best things I like about it is that it’s dirt cheap. The other is that it comes 1 1/2″ thick so when making legs, I don’t have to laminate two 3/4″ boards together exposing a glue line down the leg. The biggest downside is that the wood is very soft and easily dents however, lately I’ve been building things to look old, and a few dings and dents will only add character to the piece.

Making the legs of the table is a synch. Rip four pieces 1 1/2″ wide x 1 1/2″ thick. The next is ripping down the stock to create the carcass of the table. Because the 2 x 8 is exactly 1 1/2″ thick, getting two pieces that are 3/4″ in thickness is next to impossible. I settle for ripping it down the middle and yielding two pieces 5/8″ thick after I clean them up in the surface planer.

After I rip the stock to 5 1/2″ wide, I don’t just rip the piece all at once on the bandsaw. I set my table saw up to rip it in the middle and run a kerf on each side of the board.

Then I take it to the band saw and rip the rest of the way. This does several things. One, it saves my band saw motor as it doesn’t have to fight ripping five and a half inches of wood. Instead it only has to rip about 2 1/2″. Plus the kerf of the table saw blade creates a channel for the band saw blade to ride in so I don’t get blade drift. It’s also much faster than ripping 5 1/2″ and it also creates less dust.

Once I have my side and legs milled, I need to route the joinery to attach everything together. Using my handy-dandy Colt plunge router, I route all the mortises in the legs and sides to accept loose tenons. The process is so fast and simple I wished I would have created that Micro Fence jig ten years ago.

After the joinery was cut, I tapered the legs with my taper jig.

For the top I wanted to use 3/4″ wood as 5/8″ would be a little too thin. This is okay because I still need stock for the drawers which will be 1/2″ thick. So I simply rip the next pieces at 7/8″ on the table saw and follow-up on the band saw like I did previously.

The parts came out clean but the two pieces for the top were a little narrow. Together they were about 15″ but I needed the top be 16″ wide so I grabbed a piece of off-cut scrap and glued it in the middle.

After the top was glued, I flattened it with my 16″ surface sander and beveled the edges with a 45 degree chamfer router bit.

I needed to assemble the carcass so I dovetailed the rail on top of the drawer and loose tenoned the bottom rail to the two front legs.

The carcass fitted together nicely so I sanded the parts with 150 grit sandpaper and then glued it all together. Now I needed to work on the drawer.

The drawer sides and back are made with the 1/2″ stock. I planed a groove down each side and the back of the drawer front. I then cut them to size and routed a dado in the side to accept the back.

I cut half blind dovetails into the drawers and used my Colt plunge router to rout the majority of the waste and cleaned out the joint with chisels. Luckily I had a piece of scrap plywood for the drawer bottom lying around so I didn’t have to buy more wood. After I cut all the joinery for the drawer, I glued it all up.

As far as scrap goes, this is about it. Nearly everything from that 2×8 was used when I finished installing the drawer runners. Luckily I didn’t have any major screw ups where I would have to use more lumber because I didn’t have it.

The table came out pretty nice for $6.00. I plan on painting it (or my wife will) and give it away to my local PBS station. Next month they have an on air auction they call “Action Auction” where they auction off items from local businesses. I participated in it a couple of years ago donating this same shaker table only out of cherry. Back then, the table sold for about $135.00. It’ll be interesting to see where this one ends up. But for $6.00 and a few hours of work, it’s a good investment for getting my name on TV.

Replacing a stretcher bar on a stool

My wife was considering picking up this stool at an antique mall the other day and asked me if I could replace the stretcher bar in the middle. I told her more likely I could so she should go ahead and buy it.

The old stretcher was completely broken off and only the ends remained in the holes where it was attached. I took an 1/8″ drill bit and drilled a pilot hole in the middle of the holes on each end.

I then took a 1/2″ forstner bit and drilled out the hole cleaning it out. The pilot hole served as a guide for the point on my forstner bit so it would not wander off the center of the hole.

I then found a piece of scrap wood around the shop, measured how long the stretcher needed to be and then turned it so the middle was 1″ in diameter while tapering each end to 1/2″ in diameter.

Once the turning was done, I checked the fit of the stretcher at the hole. If the stretcher was a little tight, I shaved off some of the wood with a spokeshave so that the stretcher would fit in the hole nicely. I also had to loosen the legs a little bit by taking out the screws that held them to the frame to give me enough room so that the stretcher would pop into place. Once in, I screwed the screws back into place.

 A half hour of work and a piece of scrap wood, the stool had a replaced stretcher. Now it’s my wife’s turn to finish the stool.

Empire Wine Bar

 A few months ago my wife bought a dresser from a local auction company. When we picked it up, we noticed that the bottom drawer was so badly damaged that is was not worth repairing. Plus the drawers were only 10″ deep which doesn’t really fit with today’s needs. So, we decided that we would turn it into a wine cabinet.

The first thing I needed to do was take out the drawers and remove the frame that held them. It was a pretty easy process as the drawer runners were simply screwed in place.

I knew the part that held the wine bottles would need a cabinet of some sort so I glued 1/4″ panels to the inside to create a box. I also had to add boards to the bottom of the cabinet to support the bottom of the interior.

After much thought about how many wine bottles I wanted the cabinet to hold, I drew numerous options of the interior. I wanted the grids to go at 45 degrees and hold the maximum amount of bottles yet fit the opening of the cabinet. At first I designed the cabinet opening to hold nothing but wine bottles but after several drawings, I finally decided to make one half hold wine bottles with 4 1/2″ openings and the other half a shelf.

I built a divider down the middle and attached it with pocket hole screws. I installed plugs in the pocket holes and sanded them flush.

The fun part was making the grids. I made them from 3/4″ poplar and custom fitted each piece inside the box. The grids are attached together with dado’s and were painted brown before they were glued in.

I kept the girds shy of the face of the cabinet so that I could glue sapele on top of the poplar. Sapele is a poor mans mahogany which is what the dresser was made from. When stained, the sapele, mahogany and the painted poplar will blend together nicely.

After the interior was done, my wife painted the outside with chalk paint. She took the time to tape off the area that is stained and applied two coats of paint. After the paint dried, she rubbed some of it off to distress it, then added a dark brown glaze over the details of the piece to get in the cracks and appear old.

I applied four coats of General Finishes Arm-R-Seal oil & urathane topcoat to the top, the front of the drawers, and the grids to give the cabinet a nice sheen. We dragged it upstairs from the basement which was a big pain in the ass as it weighs nearly 200 lbs and decorated it in our dining room.

You can see how the distressing looks. The idea is to make the cabinet look old which is exactly what it is. After the glaze dries, Anita applied a light wax over the piece to protect the paint.

The design of the inside of the cabinet came out well. The grids hold eight bottles of wine and all of our various glasses. So far one of the drawers stores our wine bottle opener. Unfortunately, the other drawer will probably end up as a junk drawer.

The Empire dresser spent its first 150 years as a dresser. Now it will spend the next 150 years as a wine cabinet. Not a bad 300 year life if you ask me.

Using Pinterest to Promote Your Blog

I’ve been a member of Pinterest for a few months and have added a few Pins onto my Boards but never messed around with it too much. It’s a fun site where I get ideas on furniture designs or things that just catch my fancy but I never really knew of its potential as a marketing tool.

Then tonight while I’m browsing Pinterest, I see a stool with yardsticks as a seat. I’ve seen them before in stores and always wanted to make one but haven’t gotten around to building one yet so I decided to pin it. When I looked at the photo I clicked on it and it took me to the lady’s blog where she talked about making it.

When that happened I thought, I’ll be damned, how did she do that? Every pin I ever uploaded came from a picture off my computer. The Link box was already filled with where the picture was being pulled from. I had no idea how they were linking their pins to their blog.

After messing around with one of my pins for a while I figured it out. First I added the picture and pinned it. Then I went back in and edited the Link to my blog page. Too simple. 

What can I say, I’m not the most tech savvy guy out there. I’m still trying to figure out what Twitter is for.

Here’s one of my pins. http://pinterest.com/pin/134052526380084266/

Repairing a Desk’s Legs

My wife Anita won this desk at a local auction a couple of weeks ago. She loved the curves of the desk and wants to use it for sewing. What she’s going to sew I have no idea but that ‘s what she wants it for. It was in decent shape with a few spots where the veneer needed to be glued down and the leg needed to be glued back to the frame but that’s easy stuff to fix. What really needed attention were the two legs in the back that were missing part of their feet.

More than likely, sometime in the past the desk sat in some water and both back feet became unglued from their leg. I knew Anita was planning on painting it so I just grabbed some straight grain cherry about 1″ thick and glued it onto both back legs.

Once the glued dried, I started filing away the wood trying to recreate the swoop of the pad. Since the bad legs were in the back, it wasn’t entirely necessary to make perfect matching feet with the ones in the front since no one would really see them while the desk was against the wall but I still wanted to give it my best shot.

I used a variety of rasps and MicroPlanes to shape the curve into the foot. I’ve made cabriolet legs before so I had a basic understanding of how to shape them. Once the general shape was created, I drew the bead onto the blank and used my Dremel to carve it in.

After shaving was completed, 80 and 150 grit sandpaper finalized the foot. I was quite pleased with the results.

One foot down, one to go. It took about 30 minutes for me to finish one foot listening to the Bengals game on the radio.

After I was done with both feet, I flipped over the desk to see how it looks. Not too shabby. Once the desk is painted no one will know that the feet where redone. Anita was impressed as well. She didn’t think I would have been able to match the two in the front. I guess I’m good for something.

Empire Dresser

My wife won this Empire style dresser this week at an online estate auction site for a mere $50.00. When we went to pick it up the guy who ran the auction was telling us it was probably built around the early 1800’s and was a cross between Empire and Federal styles. The dresser was beautiful with its carved columns, mahogany veneer and old brass hardware.

The dresser was in pretty good shape with the only major damage being the bottom drawer was broken off. Fixing the veneer and making it match with the rest of the piece would be a challenge so my wife and I are thinking of taking out all three bottom drawers and turning the dresser into a wine bar with storage for wine glasses and bottles.

While taking the drawers out I was looking for a makers mark just in case this is some rare piece made by famous cabinetmaker. The last thing I want to do is to retrofit some dresser that if left alone and restored could be worth $20,000. Unfortunately I found no makers mark but I did notice that the piece was made by hand.

The drawers were made with hand cut dovetails and the bottoms were chamfered into grooves in the drawers side. No plywood was used which gave me a clue that the dresser was pretty old. Plywood wasn’t being used in furniture until around the 1920’s.

I also noticed that not that much care was taken in cutting the drawer bottoms. One of the bottom’s edge was wavy and looked like it was cut with a bow saw. Why the cabinetmaker didn’t use a hand saw to rip down the bottom is baffling. Maybe he was in a hurry or didn’t have a hand saw around at the time but, it looks like crap and wouldn’t be considered top-notch craftsmanship by todays standards. However, it was perfectly acceptable back then. Maybe there wasn’t as much scrutiny about how things were built as there is today. If I did something like that, all my woodworking friends would call me a hack.


I also could see where the cabinetmaker reused boards that he first cut dovetails for as the drawers backs. The back and the sides are simply nailed together with some finish nails. It’s possible he was planing on dovetailing the back of the drawers but changed his mind for some reason. But nevertheless, apparently back then if the part was not being shown and was hidden from the customers view, then nobody cared what it looked like inside.

The back of the piece gave me another clue as to its age. There were two pockets drilled to accept screws to hold down the top. As I unscrewed one of them, I saw that the screw had a point at the tip. Due to increased machinery technology, manufacturers didn’t start making screws with points until the 1840’s. Before that they were simply blunt and craftsmen would have to pre-drill the hole.

So my guess is this piece was probably built between 1840-1920 by a local cabinet shop who didn’t bother signing their pieces. With no makers mark, there is no way for me to determine who actually built it. I searched the internet for “Empire dresser” in Images to see if a similar dresser appeared with no luck. So in the end, with its major damage to the bottom drawer, I think it’s safe to retrofit this into something new.