Who knew? I can buy my citric acid for derusting my tools straight from the grocery store. At $8.49/lb, I’ll have to see if it’s a better deal than eBay.


Musings in the shop
Who knew? I can buy my citric acid for derusting my tools straight from the grocery store. At $8.49/lb, I’ll have to see if it’s a better deal than eBay.

We’re on our way to Chattanooga today for the World’s Longest Yard Sale this weekend. We’re stopping at spots on US127 on our way down. Vendors are now setting up today since it officially starts tomorrow. Follow me on Facebook if you want to see pictures as we go through the yard sale this weekend. Simply click on my Facebook icon on the left and “like” my page. My pictures will be a part of your feed.
Life has been busy. So here is a guy that “turned” a bowl on his table saw. Quite impressive.
I’ll be back soon.
A few weeks ago my wife and I went down to Louisville, KY for the day. There’s a new antique mall where we live called the Peddler’s Mall and noticed that there were several more of them in Louisville. So we figured we’d make a day of it and check out the malls down there. Well, the trip was nearly a waste of time as most of the stuff that was for sale in all of the Peddler’s Mall were junk. Nearly every booth was a bunch of yard sale crap where people would try to sell things like Scooby Doo drinking glasses for a buck.
Near the end of the day, I strolled down the aisle and caught my eye on an old scroll saw for $99.00. The saw was sitting on its stand in the back of the booth and had duct tape wrapped around it. I checked it over for a second and looked at Anita. She looked back at me and asked “what are you going to do with that thing?” I didn’t have an answer as I wasn’t in the market for a new scroll saw. So we left the mall and drove back home.
On my way back home I couldn’t get the saw out of my mind. I really didn’t need a new scroll saw as I don’t do all that much scrolling, but I have always longed to own a Hegner. Out of curiosity, I pulled up eBay on my phone and typed in “PS Wood 21″ scroll saw” and saw that used ones sell for $400. Ugh, I should have bought it!
A couple of weeks go by and my boss asked to do some market research in Louisville. The rep for Louisville, knew I was coming down to help him out with the research, so he asked if I wanted to have lunch with him at his favorite Chinese buffet. It sounded good to me, so he gave me the address. As soon as I pulled into the parking lot of the buffet, low and behold, the Peddler’s Mall with the scroll saw was right across the street. I told myself that after lunch that I was going back in to see if the saw was still there.
I walked into the store and went back to the booth. Luckily it was still sitting there for $99.00. I checked over the saw again and it seemed like everything was there. The only thing that it needed was a new diaphragm for the blower and a new belt. I asked a worker if there was anyway I could plug it in to see if the motor worked. She told me that there was an outlet up by the registers, so I picked up the saw and carried it all the way to the front of the store. I had to unwrap the duct tape that was holding the arms down so that they could move. As soon as I turned the switch on the saw worked just fine. Happily, I bought the saw and shoved it into my car.

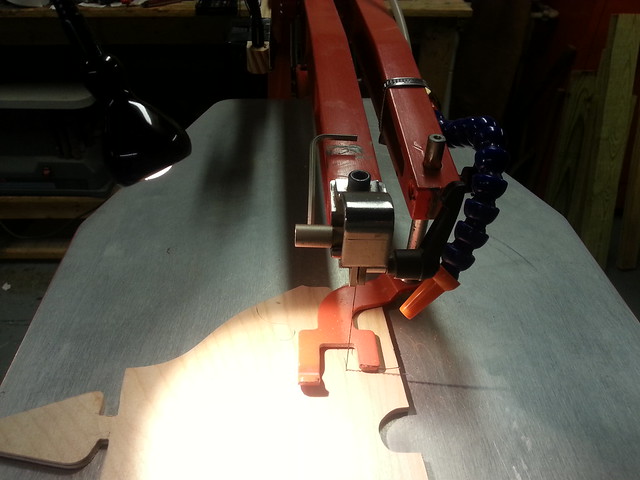
After cleaning the saw up a little bit, it worked fine. I bought the new blower and belt along with a selection of scroll saw blades to make the saw perform better. Now I wanted to snazz it up a little bit by adding a light to it so I could see what I was cutting. I ended up buying a cheap clamp-on light from Ikea for $15.00.

I needed a way for the light to hold onto the saw. I tapped the two holes on the left side arm and threaded a couple of screws into them to hold a wooden arm.

I wanted the light to have a cleaner look rather than just have it clamp onto a wooden arm. I drilled a hole through the top of the arm to be able to feed the wire of the light through.

I carefully removed the clamp portion of the light and spliced the wire to feed it through the hole. I used electrical tape to re-attach the wires and hold everything onto the arm. I guess I could have painted the arm black for style points, but no one will probably see the saw other than me.

The light turned out well as it’s a much better scrolling with proper lighting. I’ll be using this saw for decades and loving it.
Well this is my 100th post on my blog. I just want to thank all of you who find what I write interesting enough to subscribe to my blog. It was just six months ago when I told everyone that I had 100 followers. Today I have 175 and growing.
I started this blog because for years I’ve always wanted to write a book about restoring antique tools similar to Michael Dunbar’s book Cleaning, Restoring and Tuning Classic Woodworking Tools. It’s been out of print for years and I felt that the it was a side of woodworking that wasn’t paid enough attention to. However, sitting down and writing a book is for the birds as I don’t have the patience for that. I could however take a bunch of pictures of tools I was cleaning up, write about the processes and throw them on a blog. That’s why a lot of my posts are about old tools. I don’t know if I’ll ever write the book about restoring old tools though. I just found out a couple of weeks ago that Popular Woodworking is working on a second edition of Dunbar’s book.
I never thought I would ever get anything out of this blog. I mean sure it would be nice to have some advertising on the side of the page and make a little bit of money off of it. Hell, I’d use the money to pay for my golf league or take my wife out to dinner. But I’m not doing this trying to make a living or make a name for myself. For the most part, no one even knows who I am. I’ve never been mentioned on any other woodworking blogs like Chris Shwarz’s blog or The Wood Whisperer. So the fact that I have 175 followers after a couple of years isn’t half bad.
I did get a call from American Woodworker magazine editor Glen Huey a couple of weeks ago. As you may know, F+W Media which owns Popular Woodworking bought New Track Media a few months ago which owns American Woodworker. With the change over, Glen was appointed to be the editor of Am Wood. He contacted me asking if I would be interested in writing a few articles about making furniture from construction grade material like 2 x 8’s or cheap hardwood like poplar. He has read my blog and was impressed with some of the stuff I’ve been able to make with it and thought it might make a good article for the magazine. I jumped at the chance as writing for woodworking magazines has been a dream of mine ever since I was 11 years old when I bought issue #3 of Wood magazine. I ran down to the corporate office in Blue Ash, OH last week and met with Glen for about an hour. I’m in talks with him right now about some ideas of furniture I could make so, hopefully I’ll have a couple of articles under my belt by the end of the year.
Back in October I bought a Knew Concepts saw at the Woodworking in America marketplace in Covington, KY. I always heard that the biggest complaint about the saws were that they came with a cheap handle that didn’t fit with the looks of the saw. I was willing to live with the handle for awhile until I had the time to make a replacement, but I did think it was uncomfortable. In fact, the more I held it, the more I hated it. There is a company on the internet who sells replacement handles for Knew Concept saws out of exotic wood, but those handles are thicker than the original. I don’t want something that is thicker, I want a handle that is thinner.
Then a few weeks ago, I saw this antique knife sharpener in an antique store. I didn’t care about the knife sharpener part. What interested me was the feel of the handle. I knew as soon as I grabbed it, it would make a great replacement for my Knew Concepts saw. So, I ended up buying the knife sharpener simply to use the handle as a template.

In order to make a new handle, I needed to take the old one off. The handle on the Knew Concepts saw had a small little cotter pin that needed to be removed. Unfortunately, I didn’t have a special tool to get the thing out, so I had to do it the old fashioned way.

I basically had to trash the handle in order to get it off. I drilled through cotter pin and tore into the handle to remove all the wood around the pin in order to grab the pin out with a pair of pliers.

Now needed a piece of wood nice enough to make a new handle. I bought a slab of apple from a guy on eBay and cut off about 10″ from the end.

I then milled the piece into two 1″ pieces and a third piece to 1/2″

I took one of the 1″ thick slabs and milled 1″ square blanks. Each blank will be used as handles for something or another.

I attached the apple blank into my lathe and turned a new handle using the knife sharpener handle as a template. The handle is nothing fancy, but it is comfortable to hold.

The handle is turned and sanded. The end of the handle where the ferrule goes is 5/8″ in diameter because the inside of the copper fitting I used to be the ferrule of the handle is 5/8″ in diameter.

I used a 5/8″ socket wrench while the handle was on the lathe and used the wrench as a gauge to know when to stop when I turned it to size with my parting tool. As you can see, the fitting fits perfectly over the ferrule end of my handle. I trimmed the extra part of the copper fitting flush to the end of the handle with a hack saw.

The biggest challenge in making the handle fit, is cutting the mortise slot into the end. I found the center of the handle and carefully drilled an 1/8″ hole straight down the shaft. I then took an 1/8″ chisel and cut a rectangular mortise down the hole. Carefully checking every few minutes, I took my time and pared away the wood so that the entire tang of the saw would eventually fit snuggly into the handle.

Once everything fit well, I figured out where the hole of the tang lined up with the copper ferrule and drilled an 1/8″ hole through the copper. A 16 penny nail fits perfectly into the 1/8″ hole to act as the pin. I cut the nail to size and hammered it with a ball peen hammer to act as a rivet. I also used some JB Weld in the hole to give everything a bit more strength.

With a little oil on the handle, here it is. A Knew Concepts with a much more comfortable handle ready for years of use.

Today was the end of an era for my truck. My 2003 Ford Ranger was getting old and tired like an old dog. So much so, the past few weeks I was starting to get afraid to drive it far away from home. I work as a sales rep for Oldcastle selling patio block to Home Depot and Lowes and have been given some new stores to call on in Indianapolis and surrounding cities. I didn’t feel confident anymore that my truck could stand all the extra miles without breaking down. The last thing I wanted was to be in West Lafayette, Indiana and have to call my wife to come pick me up three and a half hours away because my truck broke down.

My truck starting falling apart a few years ago when quirky little things would break, like the interior lights or a remote door opener that wouldn’t open the doors all the time. I lived with the quirks because they weren’t a big deal to me. As much as I hate buying new vehicles I prolonged the pain for as long as I could.
As time progressed, bigger and bigger things would go wrong. My gas gauge would no longer work and I had to count the trip miles so I knew when I needed to buy gas. The radiator leaked antifreeze so I had to add it every once in awhile. The door molding that contained the door handle and power window buttons broke off and I had to close the door by grabbing it up by the window. Then the truck bed started to rust through, the rear gate wouldn’t open and my CD player stopped working.

I never fixed anything because every time I got a quote it was nearly a $800 to repair. Plus, at the time, I really didn’t feel like spending that much money on a truck with nearly 200k miles on it. Then about a week ago, I noticed that one of my struts was poking through my truck bed. I asked a co-worker about it and he told me that if it broke while I was driving, the bed would fall down onto the tire causing me to wreck which would be bad news. Everyday I checked the strut poking through my bed and noticed it was getting worse. In the back of my mind, I knew I didn’t have much more time.

My driveway doesn’t slope to the left. My bed was leaning that much because of the strut popping through.

I ended up getting 263,700 miles from my Ranger. When I originally bought it back in 2003 it had 23k miles on it. My goal was to drive it to 200k miles and accomplished that goal nearly two years ago. Once I achieved that goal, my new goal was 250k miles. Then last fall when I passed 250k miles, I was praying it would last another 50k miles, but knew that probably wouldn’t happen. I’m satisfied how long it lasted although it was tough to see it go today. My 2003 Ranger was a good truck that didn’t give me too much trouble. The engine ran good and the transmission was still smooth after all those miles.

My new vehicle is a 2011 Ford Edge with 25k miles on it. This SUV is nearly loaded with all the bells and whistles. It has power everything, a dual sun roof, navigation, tow package and built in satellite radio. I plan on buying a trailer so I can buy plywood and my wife can take her furniture to shows. I’m also going to tint the windows and buy better speakers for my radio. I always wanted to upgrade my stereo system in my Ranger, but never did. So a better sound system is my new goal for the Edge. Oh, and 200k miles.

I bought a Millers Falls No 7 Jointer Plane a few weeks ago that had a pitted blade in it. While most people would look at a blade like this and immediately think that it belongs in the trash, I decided to see if I could get it to work well enough to slice thin shavings off a piece of cherry.

The first thing I do when I sharpen any of my blades is to whip out my Tormek sharpening wheel. I’ve owned the Tormek for several years now and have never regretted the coin I paid for it. I set the machine up to grind a 25 degree angle on the blade and go to town.

A few minutes on the Tormek puts a real nice edge on the blade. The problem is the back of the blade is still pitted causing the blade to cut ridges in the work piece while using it in the plane.

I used the side of the wheel of the Tormek to try to flatten the back of the blade, but after a few minutes I wasn’t really getting anywhere. It did help, but it would have taken hours to remove all the pits.

I decided to give the old ruler trick a try made famous by David Charlesworth and remove only the metal at the front of the blade. I stick a thin ruler at the back of the blade and sharpen the backside of the front of the blade by moving it back and forth on a piece of 320 grit sandpaper. This in theory changes the cutting angle of the blade by a few degrees, but honestly, who cares? There is very little difference between a blade with a 25 degree angle and one with 24 or 23 degrees. It may make a difference with hard exotics, but I normally use poplar, cherry, maple and southern yellow pine. I’m too cheap to buy hard exotic wood.

As you can see if you look closely, the ruler trick worked. The very front edge of the back of the blade is clean of any pitting and will hold an edge better.

I then switched to my water stones and hone the edge created on my Tormek. I use a combination stone of 800/4000 grit and a final 12000 grit stone. I use water stones as opposed to oil stones simply because the Tormek is a water stone. Oil and water don’t mix.

Here is my final sharpening of the blade. Pretty good if you ask me.

Here’s the blade in action cutting cherry. After a few adjustments with my plane, I was able to produce nice clean shavings. The cherry underneath was glass smooth after it was planed with the blade.

How thin were my shavings? About .003″ thin. Not too shabby for a piece of crap blade that most people would have never even given a second chance and would have just thrown in the garbage.

While traveling between Greenville, OH and Richmond, IN for work, I stopped in an antique store in New Paris, OH and came across this behemoth. The flywheel on this leg vise must have been 18″ in diameter and was very smooth when I turned it.
Some of you may be aware of Jameel Abraham from Benchcrafted who makes reproduction flywheel hardware similar to this for workbench leg vises. I’ve tried one at the Woodworking in America conference a few years ago and loved it. I even considered buying one for my bench before I built my Roubo workbench a few years ago. This thing would beat up his flywheel and take its lunch money.

The screw mechanism for the flywheel is so big and heavy that it needs its own shelf. I imagine the leg vise can open up to at least 12″.

Even the flywheel on the bottom was no slouch. It was probably about 8″ in diameter. It keeps the leg vise parallel to the leg of the workbench to hold the piece more snug. Put a little grease on these babies and you’ll be ready to go.

The bench sat on casters that could be rolled around the shop. For $1500 it can be all yours. I told the shop keeper that the flywheels were probably worth $500 – $800 just by themselves. What an impressive beast.
Every few years I run across the same sandpaper cutting jig in woodworking magazines’ Tips and Tricks section. While the design may vary, the concept is always the same; screw a hacksaw blade to a piece of wood and use it to cut sandpaper in half.
I made this jig twenty five years ago and I’m amazed that nearly every time I see it in a woodworking magazine, it wins Best Tip. I originally saw this jig in a book called Making Woodwork Aids & Devices by Robert Wearing published by Sterling Publishing Co. which is a great book on making jigs and fixtures for your shop. It’s so good, the publisher released a third printing of the book a couple of years ago. If you don’t own this book, buy it!

The concept is so simple, you may feel dumb you didn’t think of it yourself. Basically cut a piece of scrap wood that is half the width of your sheets of sandpaper. Then draw a line down the wood that is half the length of your sandpaper.

After cutting the paper in half, stack the sheets on top of each other, turn it 90 degrees and line up the end with the pencil line and rip it again.

Viola, you have four equal sheets of paper, perfect for a 1/4 sheet palm sanders or for hand sanding. Go ahead and send this tip to your favorite woodworking magazine and win a set of Bosch power tools for Best Tip. You can thank me later.

