The Furniture Makers of Cincinnati 1790 to 1849

While shopping around a couple of antique stores in Lebanon, OH this weekend, I ran across this book placed on the bottom shelf of a bookcase in the back corner of the store. The book was “The Furniture Makers of Cincinnati 1790 to 1849” and it intrigued me since it was something that I was looking for a while. I have always known that back in the earlier 1800’s Cincinnati was the epicenter of the furniture industry, but I knew very little about any of the makers or furniture from that time.
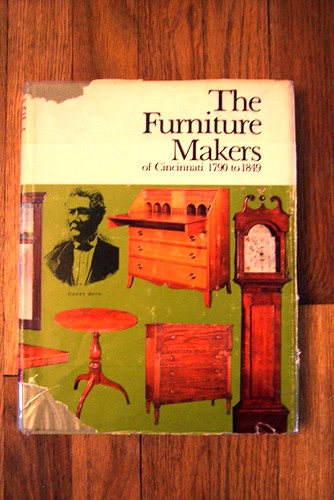
The writer of the book Jane E. Sikes, who I can only imagine was Richard Gere’s mom, was a native Cincinnatian who held degrees from Bennett College and the University of Cincinnati. She researched and documented hundreds of cabinet makers, chair makers and turners during the earlier part of the 19th century and included their name, location, and year or years in which they operated in alphabetical order. She also wrote about the furniture industry in Cincinnati and the artisans who helped carve its future. If you’re from Cincinnati and would like to read the book yourself, you can buy a used copy on Amazon. http://www.amazon.com/Furniture-Makers-Cincinnati-1790-1849/dp/B002H2TIDE/ref=sr_1_1?ie=UTF8&qid=1376267859&sr=8-1&keywords=the+furniture+makers+of+cincinnati

During the earlier 1800’s, Cincinnati was the fifth largest city in the US and the largest in the West. Steamboats carried goods from the East and to New Orleans. Being a major port for travelers on the their way out west, Cincinnati flourished economically and by 1815, Cincinnati was exporting chairs and furniture out west, selling to the steamboat trade. Because of the expanding growth and the lush local forests, artisans from all over the world came to Cincinnati to help build the furniture that was in such heavy demand.

The book has a few pages of color plates showing furniture made in Cincinnati which is what I was really after.  Being a furniture maker from Cincinnati, I’d like to pay homage to the furniture makers before me by incorporating some of their shared styles into my own designs. Anytime I watch the Antiques Roadshow on PBS, I hear the Keno brothers talk about the Philadelphia style or New York style of furniture, but never hear them speak of a Cincinnati style of furniture. Unfortunately, there doesn’t appear to be any singular design that stands out as a Cincinnatian form as Sikes wrote, “It is difficult to attribute particular characteristics to Ohio furniture in general and Cincinnati in particular. However, there are certain pieces which have descended lineally in certain families and we know that these shapes are definitely the kind of furniture made here in 1820 and 1830.” However, she doesn’t go into detail what those shapes or pieces were.

As far as the furniture industry in Cincinnati is concerned, unfortunately, the Great Flood of 1832 wiped out a lot of the furniture makers who worked and lived downtown. The river was so high that year that it was reported by William Henry Harrison that steamboats were travelling down city streets. Seven of the major chair makers were decimated as all of their tools and paint were washed away down stream. After the flood in 1834, the sudden outbreak of Asian Cholera only added to their woes when as many as 100 people died a day from the illness. Steamboats weary of traveling to Cincinnati in fears of spreading the disease bypassed the city thwarting once again the chair makers who depended on the steamboat trade. Most of them closed up shop and went onto other trades.

While examining the pictures, I think there are some similarities in the curves of the pieces that I can incorporate in my own designs in the future. Since I have lived in Cincinnati for nearly thirty years, it only makes sense to continue the proud history of furniture makers who came before me.

Page 20 has a picture of the Book of Prices of the United Society of Journeymen Cabinet Makers of Cincinnati for the Manufacture of Cabinet Ware in 1836. Books like these were legal contracts for helping unionize furniture making. Whether or not they were adhered to is anyones guess.

One of the neatest furniture makers Sikes researched was an African-American man named Henry Boyd who was born into slavery in Kentucky on May 14, 1802 and then bought his freedom at the age of eighteen. He set up shop in Cincinnati and sold his furniture to people all over the South and Southwest. He began working in 1830 and by 1850 he employed 20 cabinet makers making beds for hotels. Some of his furniture can still be seen today at the Golden Lamb Inn, the oldest hotel and restaurant in Ohio in the city of Lebanon, just two doors down from where I bought the book. I have never eaten at the Golden Lamb but I’ve heard good things about the place. Looks like I’ll have to take my wife there soon and check out some of his furniture if possible. The Cincinnati Enquirer wrote an article about Henry Boyd a few years back. http://www.enquirer.com/editions/1997/02/21/loc_blackhistory.html

Somebody who owned the book before me was doing some research as there were still a couple of hand written notes tucked inside. This is definitely a great book that I will own for a long time. Maybe I’ll add my own notes to the book someday doing research on some Cincinnati furniture makers.

World’s Longest Yard Sale: US127 Corridor

My wife and I just returned from a five-day excursion on the The World’s Longest Yard Sale down US 127. The yard sale runs every year during the first weekend of August from Michigan down to Alabama. Last Wednesday, my wife Anita rented a Ford F-250 cargo van and we headed down to Chattanooga TN to spend the night. We picked up 127 around the Kentucky Tennessee border stopping at multiple yard sales running all the way to our hotel in Chattanooga. The next day we started heading up 127 back home.

Anita was looking for old furniture to fix up as well as things she could sell in her booth. I was looking for antique tools. We traveled over 1200 miles in five days traveling from Chattanooga, TN to Castine, OH and had an absolute blast. Nothing more fun than the thrill of the hunt. We ran into a little trouble at the top of Tennessee though. It was around 7:00 pm and we didn’t have a hotel booked. We drove all the way to Danville, KY hoping that a hotel on US 127 would have a room but they were all booked. We ended up driving all the way to Lexington, KY to find a room. The next day we got up and had a nice breakfast in neat little restaurant and headed back to Danville, KY to continue up US 127.

I picked up mostly a bunch of planes, some of them needing major cleaning, with a few miter boxes near the end of the trip. What’s amazing about my finds is that most of the planes I had bought had corrugated bottoms. I wasn’t specifically looking for corrugated planes but when I turned over a plane I was interested in, its bottom was corrugated. Twelve of the fifteen planes were that way. Amazing since corrugated planes are not as common as flat bottom planes in the market.

This is the shot of the bottoms of the planes with nearly all of them being corrugated. It’ll take a while but every one of these planes will be cleaned up and ready to be put back to use.

Near Danville, KY I ran into a guy selling a trailer full of cherry hardwood. I couldn’t buy the whole trailer but I did manage to pick up one of his slabs. This piece is 2″ x 16″ x 100″ and the offer was too good for me to pass up. Does anybody want to guess what I paid for this slab of cherry? Post a comment and I’ll let you know.

Empire Dresser Veneer Repair

I’ve been working the past couple of weekends on an old empire dresser my wife bought at an auction a couple of months ago. After we got the dresser home, we noticed that the dresser had some old repairs on it. It also had a poor stain job that looked like it was sprayed on with a paint sprayer since it was covered in orange peel. So I stripped off all of the stain with Soy Gel paint stripper and wanted to fix some the repairs.

At the top of the dresser was this veneer repair. What the original guy who repaired the dresser was trying to accomplish I’m not sure, but I believe that what was underneath this veneer at one time was a lock mechanism to lock the top drawer. The lock was long gone and we had no intentions of adding the lock back in, so I decided to fix this area of the dresser with a new piece of veneer.

The original veneer on the dresser was made from a piece of crotch mahogany. I didn’t have any mahogany veneer on me so I decided to fill it with a small piece of sapele. Sapele is often considered a poor man’s mahogany being about half the cost. Plus I really didn’t feel like buying an expensive piece of mahogany to fix this little area. The good thing about this repair is that it was dead center of the case so any new repair would still be symmetrical on both sides even if it didn’t match perfectly with the rest of the dresser.

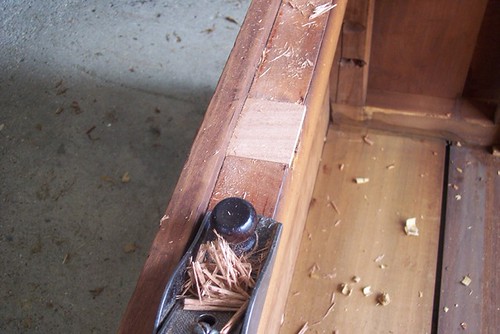
I used a card scraper and ran a utility knife down the scraper scoring the veneer. I then pared away the rest with a paring chisel. After all the wood was removed, I flattened out the rest of the area as best I could so the new piece of veneer would sit flat.

After measuring the area, I cut a new piece of sapele from a scrap board and dried fitted in place. I gently planed across the face to level it with the rest of the veneer making sure I didn’t cut into the old veneer. After everything fit, I glued and clamped it to the dresser.

The piece fit but I wanted to match the color of the original mahogany veneer. I took another scrap piece of sapele and experimented with a few colors of water soluble dyes to see how well I could match it up to the original veneer. After a few attempts, I decided to use a couple of coats of Early Brown American dye with a very light coat of Mahogany stain.

The color turned out well. Not a perfect match but well enough. Once I get the drawers done, my wife will apply a few coats of hemp oil to bring out the natural beauty of the wood. I’ll post a picture when the dresser is done.

A Day at the Auction

My wife and I went to an auction today in Germantown, OH. I saw the auction listed on Auctionzip.com last night and noticed they had some tools listed. They also had a few pieces of furniture that my wife was interested in so we headed out in the morning. This is what I won, but I didn’t want most of this junk.

When we got there, I bid on a couple of boxes of auger bits. I won each lot paying $5.00 for one and $12.00 for the other one, so I was happy with that. They’re both complete but I’m not too sure that some of the augers are original but I do have some extras.

A few minutes later I won a measuring wheel. I’ve seen Roy Underhill use one of these on The Woodwright’s Shop one time and thought it was neat enough to buy. I believe these were mainly used by blacksmiths for measuring. They had a lot of blacksmith tools for sale there so I figured it went with all the other stuff.

As the auction moved down the tables, I had my eye on a Spear & Jackson back saw. It looked in pretty good shape with split saw nuts and a small bend in the blade which is typical for old saws. I waited patiently for about 45 minutes as the auctioneer was approaching the saw. When he got to the table his helper was moving items toward him. Once he got to the saw, the helper grabbed a bunch of other junk and pushed it to the auctioneer. I got pissed because I just wanted to bid on the saw and not have to compete against other bidders for the stuff he put with it.

Luckily no one else really wanted the saw or the crap that went with it as I won the lot for $15.00. After I won, my wife grabbed a box and threw everything in it and I took it to the truck. Walking to the truck I peaked in the box out of curiosity to see what else I won.

As I said, most of it was junk. I won an old hammer, a sickle of some sort, an assortment of hog ringers, oil can, saws, wire brush, an old blue tool box, pruners, an axe, and a cigar box. I’ll throw the hog ringers in the tool box and sell them on eBay as one lot. As far as the rest, I may just throw them in the garbage with the exception of the axe and wire brush.

When I looked in the cigar box, it was filled with old cut nails which was a pleasant surprise. While I have never used cut nails in the past, it’s nice to know that I now have them in case I plan to make a proper antique reproduction. I thought about selling them on eBay but they only go for about $10/lb, so screw it, I’ll keep them.

As far as my wife and her bids on furniture, she got skunked as everything she was remotely interested in went too high. I too got skunked on the planes that were at the auction. Most of them went for more than I was willing to pay but that is how the game is played.

Early Taylor Bar Clamps

Every 4th of July I travel to Adams County, OH to attend an antique tool auction held by the Amish. It’s been something I’ve been doing for the past fifteen years and it has become a tradition for me as something I always looked forward to all year. Every year I would come home with a ton of tools I picked up at a bargain hoping to make a little cash selling them on eBay. It started to decline the past couple of years and I was afraid it might end as the tools weren’t much to choose from and the quality of them were lacking. Well with the economy in the tank and $4 gas hitting the streets, the auction didn’t happen this year.

Bummed out, my wife asked if I wanted to go to an antique mall on the other side of Cincinnati and look around. We go there from time to time as she looks for things to sell in her booth. I rarely if ever find tools so I wasn’t too optimistic finding anything.

After we arrived, I spotted these clamps on the floor of a booth. They intrigued me because while I’ve seen old clamps before, I’ve never seen a clamping action like these. They worked off a cam action from the handle. As you pull the handle up, the shell shaped curve pushes the pad out. I debated getting them because old bar clamps are not very collectible and I really didn’t need them. Plus they were $22.00 a piece. But my wife said if I wanted them I should get them because the next time we were here, they’d be gone. So I used my wife’s 10% vendor discount and picked them up.

These are clamps after I dipped them in citric acid/water mix and cleaned the rust off with steel wool. The clamping range is about 20″. I thought it was a little odd that they weren’t designed to hold 24″ between center but I guess the inventor had his reasons.

Here’s the detail of the handle. You can see how the pad gets pushed out as the handle is raised. It’s simplicity is what makes the design so beautiful.

You can clearly see “The Taylor” on the face. I googled “taylor clamp co” and came up with www.jamesltaylor.com a manufacturer of mass production clamping and gluing machines. After I cleaned the rust off the bar I could faintly see the “The Taylor Manufacturing Co, Poughkeepsie, NY” so these clamps are obviously there’s. However, I was left with a big question.

l

On the jaw there was a patent date of Jan 2, 1900. On the Taylor website they claim that the company was founded in 1911. How were these clamps patented in 1900 while James Taylor didn’t start his company until 1911? obviously John Taylor must have been a sole proprietorship for a few years tinkering around with designs before developing the typical design used today. Are these clamps some sort of prototypes or first edition models?

You can faintly see the logo “The Taylor” in an oval logo very similar to the Taylor logo used today. John must have simplified his logo when he incorporated in 1911. I looked all over their website the to see if they mention these style of clamps with no luck. I even tried searching the US Patent office on the internet for more information but came up empty.

James L. Taylor Manufacturing Co. Inc logo used today.

While the origins of these clamps remains a mystery, the real question is how do they perform? The answer is amazingly well. While they may not provide as much torque as typical bar clamps, they are extremely quick and easy to use. Where they excel is in gluing up cabinetry where you need speed on your side. Simply put the clamp around the stock and pull the handle up. I clamped a piece of wood to my workbench and tried moving it with no luck. They hold rock solid.

Another advantage with these clamps is they would appeal with people with arthritis. Often the screw handle on regular clamps can be tough to tighten with people who suffer from arthritis. With these clamp, they can easily tighten them up. There may be a real market for these clamps being manufactured and sold today as woodworkers are getting older every year. Hmmm….

Modern Moxen Vise

A few months ago I wrote about how I attached a Micro Fence to my Bosch Colt plunge router. The link is below:

http://wp.me/p1gfza-cD

The tool works great but I wished I had some sort of guide system to make routing tenons even easier. Then one day as I was cleaning up my shop, I came across a Popular Woodworking magazine I had stashed away. The issue was from Oct, 2012 and in it was an article about making an improved Moxon vise the writer called Gizmozilla. When I saw it I thought to myself “oh yeah, I forgot about that thing”. I stashed it away because I was planning on making it some day and since that I had the Colt plunge router, now would be a perfect time.

The writer of the article, Kenneth Speed, used maple to laminate a beam that was 3 1/2″ square by 4 feet long. I knew that was a little too big for me since I was using a small trim router instead of a big plunge router, so I milled a 4×4 to 2 1/2″ x 3″ x 3′ long.

I then built the trough system that would guide my Micro Fence fence. This was the most difficult part of the project because I needed to make sure that the trough of my fence was loose enough for my router to move freely, but not too loose that it would create slack completely defeating the purpose of using the Micro Fence. After a couple of attempts, I had the right thickness to make it work.

I then had to route a couple of grooves in the beam to accept T-tracks that I bought from Rockler. Those things didn’t come cheap as I paid nearly $20 a piece for them but I wanted to have adjustable stop blocks the same way Kenneth had. I also attached feet to the ends by laminating a couple of 3/4″ scrap plywood together. I have a couple of holes drilled through my workbench about four feet apart so I can hold the fixture to my bench with a couple of hold fasts.

Kenneth used store-bought knobs to hold the stops tight to the fixture but, I wanted to try to make my own so I grabbed some scrap maple, a 1 1/4″ hole saw, and drilled out six plugs to create little knobs.

Once the plugs were cut, I traced around a 1/4″ nut with a pencil and gently carved out the inside with a 1/4″ chisel.

After the area was all carved out, I inserted a nut and shaved three sides of the circle on my disc sander to create a soft triangular-shaped knob. Once all six knobs were made, I used some five-minute epoxy and glued the nut inside the knob so it wouldn’t slip out during use. The bolts that they are threaded to are nothing more than 1/4″ carriage bolts with modified squared off heads to pass through the T-track.

Kenneth used Jorgensen hold-down clamps and a fancy caul system to hold the wood to the fixture however, I wanted to keep the fixture as simple (and cheap) as possible so I simply use a couple of Jorgensen F-style clamps to hold the wood to the fixture.

Everything looks good but I needed to see how well it worked. I took a couple of pieces of scrap wood and placed a loose tenon over the joint and marked where I wanted the tenon.

I transferred those marks around the edges of the wood so I could then gauge where the router needed to cut. I also marked the “face” on each piece so I knew in which direction the piece needed to be place on the fixture so that the face of the boards would line up evenly.

I set the stop blocks where they needed to be and made a test cut while placing the face of the work piece on the inside of the fixture. Everything looked good on both pieces and fitted together nicely. This joint was super fast and easy to create!

The beautiful thing about using the Micro Fence is that if I do need a thicker tenon, I simply use the brass stops on the sliding bar of the fence to limit the travel of the router on the Y axis.

I now have accurate three-dimensional cutting availabilty using this fixture. The fence stops act as the X axis, the Micro Fence guide rails act as the Y axis, and the plunge router base acts as the Z axis.

Much like Kenneth’s Gizmozilla, the fixture can be used as a regular Moxon vise for cutting dovetails by hand or with a power router when I use my Keller Dovetail System.

This was a super simple fixture to make and it has already been very useful in my shop building a couple of outdoor benches. I’m sure it will be the most valuable jig/fixture I have ever made.

Is Wood Magazine Going Shabby Chic?

I received the latest issue of Wood magazine yesterday and noticed a project on the cover that I had seen before but with a different twist. They showed an entry bench made from an oak door. I recognized the project because I’ve seen it done a few times before but only with an old door that was repainted.

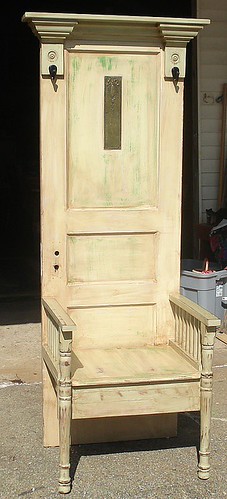
The style is called shabby chic and is very popular among women. The idea is to take old items, commonly referred to as “junk”, and repurpose them into modern hip accessories or furniture for your home. There are thousands of websites and blogs as well as a number of magazines that focus on the shabby chic style. There are even a couple of TV shows where the hosts’ buy old items and use them as design elements around the home. Below are some old shabby chic doors repurposed into benches.


This one is very similar to Wood magazine’s cover photo.

I know all about the shabby chic style from wife Anita. She has a business called Bella Chic Decor where she finds old pieces of furniture and paints them with chalk paint to give them an old worn look. Sometimes she’ll ask me to repurpose an item she bought into something more useful. In fact, I wrote a blog about repurposing an old door into a headboard a few months ago.

https://mvflaim.wordpress.com/2012/07/10/turning-a-headboard-into-a-bed/

I don’t have any problem with shabby chic stuff even though it’s really not my cup of tea as it tends to be very femine. You may not be crazy about it either, but chances are your wife, sister, or daughter probably likes it. It’s all the rage these days and offers a cheap alternative from buying mass-produced laminated press board crap that you’ll find in retail stores. Often old antique furniture is solidly built, but just needs to be updated a little bit to fit with the modern decor of homes.

When my wife saw the cover of the magazine she asked, “why didn’t they just use an old door”? That’s a good question. The editors at Wood magazine estimated the cost of building the bench at $375. One could buy an old door on Craigslist for about $20.00, use poplar hardwood and birch plywood to build the sides, paint everything a neutral color, and end up spending about $100 for nearly the same look.

I can imagine the editors of Wood magazine sitting around in a meeting room asking each other if they should just use an old door and paint it. They probably realized that woodworkers love wood grain and consider painted furniture sacrilege. In fact in the first paragraph of the article, they mention that one could make this project using an old door from a salvage yard. It’s just a shame that they didn’t show a picture of a bench made from an old door to give the reader an idea of how it looks.

Restoring a Hand Saw

A few weeks ago, while at the Tri-State Antique Show in Lawrenceburg, IN, I came across this old Disston saw. It was in decent shape barring a little rust but the blade was straight. The dealer was only asking $8.00 for it so I decided to buy it and see if I could bring it back to life.

Overall, the saw was in pretty good condition, it just had a few issues with the handle. The top of the tip was chewed up and a part of the side was busted on the other side. I grabbed a piece of beech scrap wood and cut out a couple of blanks to fix the handle. The beech came from an old jointer plane I bought decades ago. It was missing the blade so I ripped it straight down the body into 3/4″ planks and have been using it to repair other tools for years.

I could have cut off the entire tip of the saw and glued in a new piece of wood but I decided just to shave the worn area away with a chisel. This way, the other side of the handle would be left undisturbed.

After I carefully cut out a blank that matched the angle of the shaven off area, I glued it in place with some woodworkers glue.

After the blank was glued and had dried, I used files and rasps to bring it to final shape. I wanted to make sure the wood matched the original shape which was easy because the other side was still there.

Next I flipped over the handle and started working on the part that was missing from the front of the handle.

I cut another piece off my scrap beech and glued it to the handle then shaped and sanded the wood.

The handle came out well but the contrast between the old beech handle and the replaced beech was pronounced. I decided to darken the entire handle down so it would all match. The first thing I did was tone down the wood with walnut aniline dye. I rubbed a couple of coats on it with a sponge and let it dry. I then applied a light coat of dewaxed shellac so I could wipe on a couple of coats of General Finishes Walnut gel stain.

While the handle dried, I focused on the blade. This was the easy part. I simply soaked the blade in a citric acid/water solution for a couple of hours and wiped it clean.

After I wiped it off I used some fine grit sanding sponges and cleaned up blade a little bit more. I also cleaned up the saw nuts with some 000 steel wool.

The saw turned out really well. I just now need to sharpen the blade. I’m no expert on saw sharpening so there’s no sense showing you how I’ll sharpen the saw because I’ll just be following someone elses instructions. There are a bunch of videos on YouTube on saw sharpening so pick your favorite and have at it however, for the money, Ron Herman’s “Sharpen Your Saws” by Popular Woodworking is worth every penny. Ron is considered to be one of the foremost experts on hand saws in the country and his DVD showed me everything I needed to know how to make a saw sing. http://www.shopwoodworking.com/sharpen-your-handsaws-w5169

My Shop Assistant Isn’t Very Helpful

Yesterday while changing the blade on my band saw, one of the little knobs that hold the top and bottom doors closed, fell out of my hand onto the floor.

I’ve never been a big fan of these knobs because they are so small, they slip out of my hands every time I hold them, but they do work. Just my luck when the knob hit the floor, my dog Bentley ran over to it like it was a toy and started playing with it, sticking it in and out his mouth like a ball. After I was finished changing the blade, I asked Bentley were the knob went. He just looked up at me like “what knob?” I spent a half an hour looking for that stupid knob all over my shop, underneath all my benches, tools and everywhere else in the basement. I keep my shop floor pretty clean so it shouldn’t have been too hard to find a piece of black plastic.

Without that knob, It’s hard for me to keep my top door of my band saw closed. I had to settle with some crappy little nut until the knob reappears (hopefully soon). All I know is if Bentley poops out a little black triangle in the next couple of days, I’ll know where the knob went.