Making Walnut Stain

I have a big walnut tree in my backyard that drops hundreds of walnuts on the ground every fall. For some reason the walnuts were excessive this year as I have never seen so many on the ground. It must have been a good year to be a walnut tree.

I usually just trip on them while I cut the grass but I decided it might be fun to try to make my own walnut stain from the nuts.

I looked around for the walnuts that had opened up while the squirrels were giving me dirty looks and took about a dozen of them to my shop. I then wrapped them in an onion bag and tightened them up so the walnuts wouldn’t fall out. Wrapping them in cheese cloth would work just as well.

I grabbed a big pot I bought a few months ago and a hot plate burner to cook the walnuts. There was no way I was going to use a pot from my wife’s kitchen as I didn’t want to get punched in the face. I filled the pot with water with a couple of gallons of water, placed the nuts in it and turned on the hot plate until the water was at a boil.

After the water came to a boil, I turned the hot plate off and let the walnuts sit in the pot overnight. In the morning, I dipped a stick in the water to see how dark the stain was. It wasn’t as dark as I would have liked so I turned the burner on again. After I got the water to a boil, I turned the hot plate to low and let the walnuts simmer in the water for a few more hours.

This was the most frustrating part of the process. I kept testing the stain on some scrap oak to see how dark it was. Every hour I checked, the stain was real light and looked like tea. I started to think it wouldn’t work. So I decided that I probably had too much water in the pot and poured some of it in the sink. After removing about half the water and cooking the walnuts for a few more hours, this is what I was left with.

Satisfied with the color, I poured the stain into a mason jar using a funnel and paint strainer to collect all the gunk that had accumulated in the water from the walnuts.

This is how the stain looks on white oak. It dries a little lighter than this and raises the grain a bit but considering I made it from nuts in backyard is pretty cool.

I marked the date on top of the can so I know how fresh it is. Ideally you would want to store the stain in the refrigerator so it doesn’t go bad, but I doubt I’ll do that. I’ll  keep it around and test it every week to see how long it lasts. Unfortunately, I have nothing to stain right now. Maybe I’ll make a bookcase out of oak in the next few weeks so I can at least use it before it goes bad.

Free Year of Digital Crafts Report

Free Year of Digital Crafts Report

Here’s a quick post for all the Artisans out there. Right now, The Crafts Report is offering a Free one year digital subscription of their magazine. I’ve gotten the Crafts Report in the past and it is a great resource on how to market your business. The offer ends in a few days so don’t delay. I subscribed last night and it appears to be no strings attached. Just click the box of one year digital subscription and hit enter. No credit card needed.

Holy cow, they added me to the testimonials feed!

Fixing a Childs Rocking Chair

My wife’s cousin’s husband (does that make him my cousin in-law?) has a childhood rocking chair he wanted me to fix. My wife Anita brought to me and asked me what I could do with it. I looked it over for a few minutes and noticed that it had old glue repairs and screws all over the place trying to hold everything together. It must mean a lot to him if he tried so hard to keep intact, so I decided that it I’ll give it my best to return this chair to its former glory.

The first thing I had to do is carefully disassemble the top of the rocker and save as many pieces as possible. The seat was a piece of MDF that I was going to use as a template for the new seat.

The crest rail was all beaten up so I had to cut a new piece out of poplar using the original as a template.

I then used the holes off the old crest rail as a pattern for the new crest rail and drilled the appropriate size holes.

Since I was using the seat as a template, transferring the holes to the new seat was easy. I simply stuck the auger bit in the hole at the appropriate angle and drilled through. I realize that in theory that this doesn’t exactly work because the angle in which I drilled the holes through the new seat won’t perfectly line up with the where the holes are in the original seat, but the difference was miniscule and not enough for me to be concerned with.

After the holes were drilled, I shaped the seat on the band saw and cleaned up the edges with rasps and files.

I needed to make new spindles underneath the arm stretchers as one of them looked like a dog chewed on it. Luckily I had a couple of short 5/8″ dowels that would work.

I needed to put a 1/2″ tenon on them to fit in the 1/2″ holes I drilled through the seat. I used my tenon cutter and brace to do the job cutting a tenon on both ends of both pieces.

The test fit looks pretty good. Now I needed to make 3/8″ dowels for the back spindles.

I didn’t have a 3/8″ dowels on hand but I do have my Stanley No 77 dowel machine with a 3/8″ cutter in it. I actually sold this tool on eBay earlier this year, but the guy I sold it to claimed it was damaged in shipping so he returned it. I took it as a sign that I should keep it.

I grabbed some maple and cut 7/16″ square stock on the table saw. I then took the stock and shoved it into the cutter while turning the handle which makes the cutter head spin cutting the square stock round.

In no time flat I get perfect 3/8″ dowels. I cut them to size and stuck them in the holes to act as the back spindles.

After some sanding and glue, the rocking chair is back in business. Now Anita will paint it and give it back to her cousin’s husband.

UPDATE 12/24/13

The rocking chair has been repainted just in time for Christmas. My wife Anita did a nice job painting it with chalk paint and distressing it a little bit. We’re on our way to my Anita’s cousin’s house to deliver it to her husband. I’m sure it will be well received.

Woodworking in America

I stopped by the Marketplace at The Woodworking in America show in Covington, KY today after work. Living in Cincinnati I’m spoiled that I get to waltz right in like it’s no big deal when the majority of people who attend have to make travel plans and hotel accommodations. I attended the first WIA a few years back in Berea, KY and had a blast listening to presenters like Roy Underhill, Brian Boggs and Frank Klaus. However, the money has been too tight for me to afford to attend any of the seminars since then.

I picked up a few things while I was there, nothing much. I mainly went there to buy the book “By Hand & Eye” by George Walker and Jim Tolpin. I’ve read good things about it and knew Lost Art Press would have a booth so leaving with that was a no-brainer. I also picked up a couple of DVDs about using SketchUp. I’ve been wanting to learn how to use this design software for years but after fiddling around with it in the past, it never clicked. Hopefully the DVD’s will make a light bulb go off in my head.

I stopped by the Knew Concepts booth and looked at their fret saws again. I see them every year but they never bring any inventory to sell. They would give me a card and tell me to go on the website and use it for free shipping. Every year I took the card and just forgot about it. Well not this year. They finally brought saws to sell so I bought one.

I’ve wanted one of these saws for a few years now. They are much stronger and hold the blade much stiffer than an ordinary coping saw. I’ll use it mainly for cutting the waste out of dovetails as well as some fret work from time to time. The difference between a Knew Concepts saw and a coping saw is night and day. I may turn a new handle for it out of cocobolo to beautify it someday, but I’m in no rush for that.

With my Knew Concepts saw, my coping saw is perfectly happy in his new home.

All in all, the Woodworking in America is a good show that’s worth going to. It’s not like The Woodworking Show that travels around the country. It’s mainly focused on hand tool woodworking so you won’t find a lot of power tools or boxes of discount belt sander sanding belts. About three quarters of the vendors focus on hand tools which is fine by me.

I was disappointed not to see Welch chair maker Don Weber again this year. He hasn’t attended in a couple of years and I’m not sure if he will again. I took a blacksmithing class from him a few years ago at his shop in Paintlick, KY. He’s extremely knowledgeable about woodworking and a hell of a craftsman, as well as down right a nice guy. I did talk to a few young chair makers who were selling some sweet ass chair making tools. I wanted to buy a drawknife sharpener and adjustable calipers but my funds were already spent. I got their cards so maybe sometime down the road I’ll buy them off the internet.


Using a Vacuum Press

Every once in a while I pull out a tool that I haven’t used in long time. I bought this vacuum press about ten years ago figuring I would use it all the time making custom plywoods out of exotic veneer but that’s never been the case. I think originally I saw David Marks use one on Woodworks and thought to myself that I had to have one. Even though I’ve only used this vacuum press about four times since I bought it, I’m still glad I did because now I need it.

I make thick wooden letters for my wife Anita. She paints them different colors and sells them in her booth. I usually make EAT which women display on their kitchen tables. The letters are made from 1 1/4″ MDF however, I can’t find a local supplier for 1 1/4″ thick MDF so I buy 1/2″ and 3/4″ MDF and laminated them together. Next month Anita is going to have a booth at a local Shabby Chic design show called Over The Moon in Lawrenceburg, IN. I figured I’d help her out and make more EATs and a few NOELs for Christmas. She sells them for $5 – $6 a letter which isn’t much but they are super easy and quick to make. Plus everyone she sells will help pay for the cost of the booth.

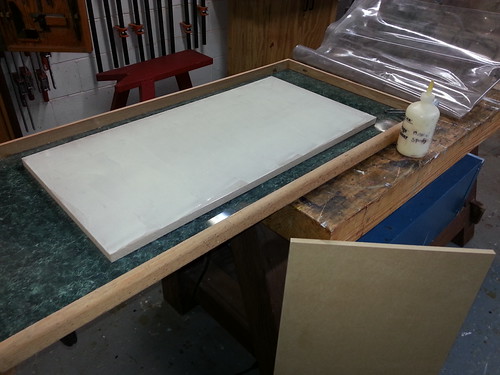
In order to laminate the two boards of MDF, I need the ability to properly clamp the boards together so that they press against each other equally. That’s where my vacuum press comes in handy. In order to maximize the torque of my vacuum press I built a clamping box for it. The box is nothing more than two 3/4″ MDF boards with grids cut on one side and glossy laminate on the other with the bottom board wrapped in a frame. The grids on the top help with air flow as the vacuum is working, and the laminate helps any glue squeeze out from sticking to the inside of the box.

Using the press is quite simple. I spread glue all over ope of the pieces I want to laminate making sure I get a 100% coverage. I get better results only spreading glue over one of the pieces and not both. When both pieces have glue on them, they tend to slide around when I put them in the box.  Once both pieces are stuck together, I place the top half of the box on top of them to act as the press when the air is removed.

I slide the entire box into the an industrial plastic bag with a nozzle on top and use a couple of wooden cauls to close the end of the bag. I then use as many clamps as needed to seal the bag so that it’s air tight.

I then hook up my vacuum press and turn it on for a few minutes to suck out all the air like a gigantic Food Saver machine.


You can see how tight the bag becomes once the vacuum starts working. After I’m satisfied with the pressure, I leave the boards to cook for a couple of hours. It’s important to turn off the vacuum and listen carefully for any air leaks that may be present. Notice the orange Jorgensen clamp at the bottom where I had to fold the plastic on top of itself in order to stop a leak. 

After a couple of hours, the boards come out perfectly laminated together. If you’re interested in learning more about vacuum presses, go to www.joewoodworker.com. It’s where I bought my vacuum and all the necessary accessories.

Empire Dresser

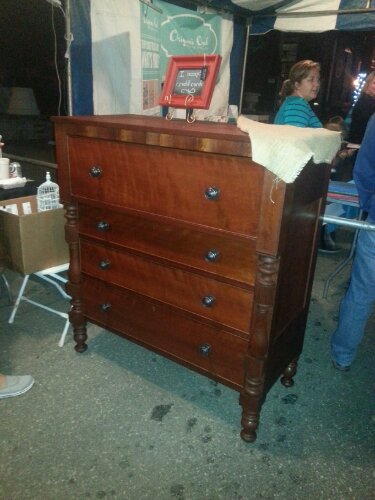
The Empire dresser is officially done. My wife Anita found some nice oil rubbed bronze drawer pulls on the internet after looking locally for some with no luck. It originally had glass knobs on it, but a few of them were in rough shape and not all of them matched. I think the drawer pulls she picked out look really nice and add to the character of the piece. She applied four to five coats of hemp oil to the dresser. It gives it a warm aged look without making it look too glossy.

I put a few hours in this as well. I had to strip all the old stain off, patch a veneer job, re-band all the drawer fronts with sapele, replace a brass key escutcheon, and reinforce some of the drawer bottoms with pieces of poplar.

She plans on selling this in her booth with her painted furniture and antiques this Saturday at a local street fair in Milford, OH called the Longstone Festival. She was lucky enough to get a booth as there is usually a waiting list every year. Hopefully it will sell there. I will let you know if it does. http://www.longstonestreetfestival.com/

Frames, Frames and more Frames

Last night, my wife Anita took me to an old frame factory in downtown Cincinnati. The factory stopped operating over a hundred years ago, but it looked like the frames hadn’t been touched since the workers packed up and went home.

Anita met a lady about a month ago who was selling some frames from the building and told us that she was going to have an open house on Aug 23rd to try to get rid of some more and invited us to come. Because Anita makes chalk boards out of old frames, she made an appointment with her to view the building before the open house to buy some of her frames, but going back to the open house was still a no-brainer as she wanted me to see the place.

When we arrived, there were people greeting us offering wine and cheese. I didn’t know if I was coming to a rummage sale or a gallery viewing, so I grabbed a glass of wine and headed upstairs. When I got up there, all I saw were tens of thousands of frames stacked everywhere. The floor was probably 5000 square feet and every inch was packed with old frames. It took five minutes just to absorb all of it as I wandered around checking everything out.

The factory stopped operating in 1910 and must have specialized in round and oval frames as there were thousands of them spewed out all over the floor. Every shape and size from tiny to gigantic were available as an oval. They did have some square frames available, but 95% were round of some shape. The owner said the building sat like this undisturbed since 1910.

Not all the frames were primed. They had some really nice ones made from mahogany in all sort of sizes. My wife bought a few of these before and cleaned them up with hemp oil. They look fantastic cleaned so she bought a few more last night . You can see the hundred years of dust that laid on these frames undisturbed.

Sadly, all the old machinery were long gone. I looked around the building for remnants of the machinery, but only came across this glue applicator directions inside one of the posts of the building. It’s from the Casein Manufacturing Company explaining how to properly use one of their mechanical glue pots.

The only big machine left was this nice old blower. There were a few pieces of duct work that went throughout the building, but I’m not sure what it was used for.

Anita ended buying 50 frames for $250. Dirt, dirt cheap as some of the old frames she picked out can go for as high as $35.00 a piece in antique stores. Now she needs to clean all of them up and turn them into chalk boards.