The past few days, Anita and I have been working on finishing up the dining room and hallway. After I struggled to throw up the crown molding, attaching chair rail felt like childs play. The trickiest part was coping both ends at the end of the hallway.
After the chair rail was nailed up, I attached the rectangular boxes I made with my molding planes. Then Anita caulked and painted everything white on the bottom, and a light grey on top. She bought a custom rug from Pottery Barn that fits the hallway nicely. Now she plans on hanging some pictures on the wall and get a new light fixture to spruce things up. This was a cheap and easy way to make a hallway look more elegant.
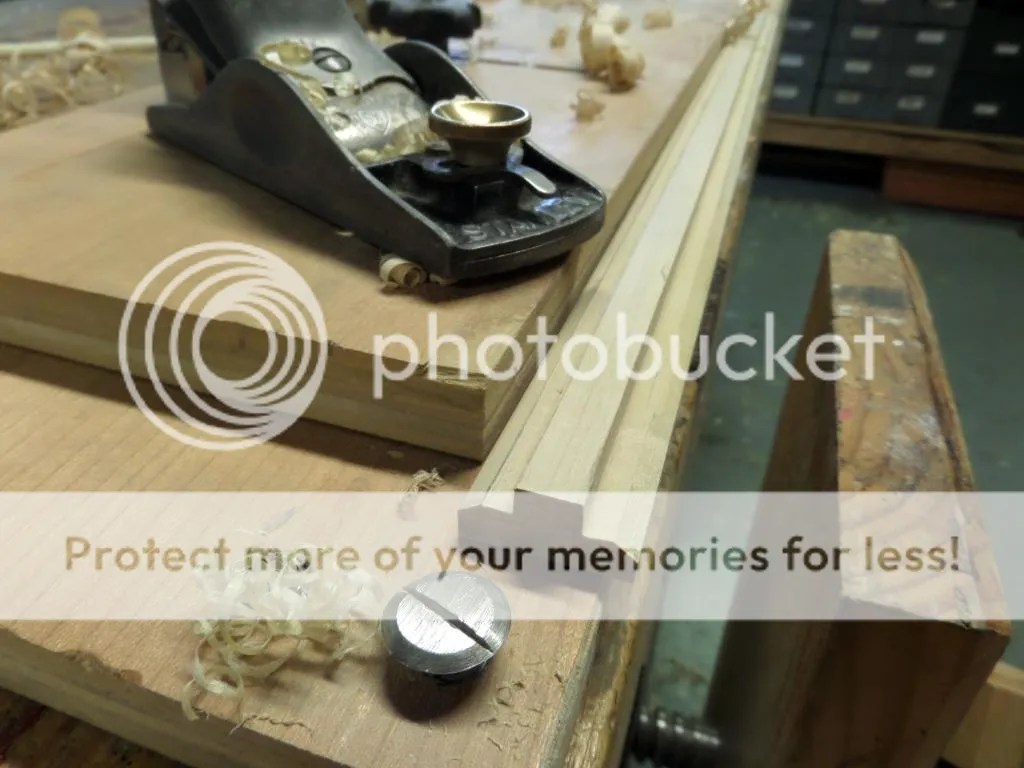
Here is a close up of the faux wainscoting boxes I made. They add quite a bit of detail to the walls.
Last weekend I proceeded to work on the dining room by installing crown molding around the ceiling. I already built and installed bookcases that went on either side of the sliding glass doors a couple of weeks ago. Now I needed to complete the look by installing crown molding at the top.
Before I began, I watched a YouTube video with Tom Silva of This Old House to give me the idea of how to cut the molding. The trick was flipping the board over and cut the trim upside down. Clamping a board on the saw table helped kept the trim at the proper angle.
The molding around the bookcases wasn’t too bad as the sides were 90 degrees to each other. However, when I ran a piece down the one side of the dining room to the hallway, is when I got tripped up. I may be able to hand cut dovetails, but a trim carpenter I am not. I have no idea how they cope one end of the crown to fit perfectly, then make a perfect cut nine feet away to make a tight corner to a wall that is out of square. I gave it my best attempt and attached the crown to the wall. I then tried to figure out the other angle the other piece of trim would need to be to make the corner look nice. However, every cut I made was way off. I tried about a dozen times to make it work with no luck. I became so frustrated, that I decided to quit Saturday afternoon and reconsider continuing with the room or just take everything down except the crown around the bookcases.
I woke up Sunday morning and decided to give it another shot. I messed around with the other side of the crown molding for a couple of hours until I was satisfied with how it looked. Below is a picture of the finished corner. I had to shave a lot of the molding away with rasps so each piece would match. I probably should have sanded the pieces better, but I was so frustrated with it I said “screw it”!
Fitting the crown for inside corners was a bit tricky as well. Even after I coped the ends, I had to file the back of the molding so that it would fit in place. However, after practicing coping a few times, I got better at it.
This was the final piece I cut to finish the job. It was a bit tricky as I had to cut the trim at the correct length as well as perfectly cope each end so everything fitted nicely.
After everything was done, Anita started to apply the first coat of paint. Next I’ll be working on the chair rail and the faux wainscoting molding squares I made a couple of weeks ago. I’ll throw up a few pictures of the finished dining room and hallway when I’m done.
A few weeks ago I wrote about how I was able to recreate trim that my wife wanted to put on our walls. I had some time this weekend to make all 36 pieces of trim each about 24″ long. It was fun making the trim, but after number twenty, it started to get old. Thankfully, it only took me a few minutes to cut the profile in the wood once I milled the rabbets into each side of the wood.
I decided to do a short video showing the process better than just showing it in pictures. Enjoy!
On my last post, I tried to weather some southern yellow pine to make it look old. Well, this screen was the reason for my attempt. I made a couple of these screens for my wife as a backdrop for when she does shows. Building them was super simple. I took a 2 x 8 and ripped it to 3″ wide and ran a 3/4″ wide, 1/2″ deep rabbet down one side.
I then pinned and glued fence boards and wood from an old pallet to the rabbets with some 18 gauge pneumatic nails to create the slats. The assembly is so simple that the majority of my time was milling the wood to the proper thickness.
When making the second screen I decided to change the process just a little.
Instead of planing the 2 x material from 1 1/2″ down to 1″, I decided to re-saw the material to 1 1/8″ on my band saw instead. This saved a lot of time and a whole bunch of planer shavings. You can see the off-cuts that I had from building the second screen on top of my table saw. I’m sure my planer knives thank me for not having to plane off all this crap.
Unfortunately, a big obstacle when using 2 x material is sometimes after I rip the boards in half, they spring back due to their high moisture content. I try to buy straight grain boards with no pith in the middle, but sometimes that’s not good enough. You can see in the picture some of the boards that released their tension once I ripped them in half. I had more than a full 2 x 8 board of waste making these panels.
The day of the show, the screens did their trick. You can see one of them in the background, however, I think they would have looked better being toned down with a weathered stain. Maybe next time.
Several months ago I wrote a blog about weathering pine with little success. Well, I decided to give it another try. My wife had heard of using a mixture of apple cider vinegar and steel wool to coat the wood to give it a grey finish. We heard of using regular vinegar and steel wool, but apparently, the tannins of the apple cider penetrates the fibers of the wood to give it a richer older look.
I gave the mixture a shot on a piece of southern yellow pine and poplar to see how it would turn out. At first, the wood hardly changed at all.
However, after twenty-four hours, you can see how the mixture turned the wood dark on both the poplar and southern yellow pine. However, even though the wood did react, my wife was looking for something that looked more grey and less muddy brown.
I tried applying some ebony paste wax to the wood, but that didn’t turn out well at all. It just made the wood look more muddy.
I then decided to do something a little different and burn the wood with a propane torch.
After the wood was burnt, I used a piece of steel wool to remove the charcoal from the surface. This left the board with a texture where the early wood and late wood were at different levels.
I was impressed by the way the wood looked and felt that I applied clear and ebony paste wax on the sample to see how each half turned out.
I was so intrigued by this method that I flipped over the board and tried this technique on the whole board and applied the clear and ebony paste wax on each half.
Even though I didn’t create the look my wife was looking for, I really like how the wood looks after trying this technique, especially with the clear wax top coat. I’ll have to try it out on a completed project sometime. Now only if I could figure out how to make new pine look old without leaving it outside for six months.
My wife, Anita, is planning on sprucing up our hallway by installing faux wainscoting on the walls. It’s a simple approach by installing chair rail and trim in a rectangular fashion down the wall.
We went to Lowe’s and Home Depot to find the type of trim to use for the rectangles. Unfortunately, there was nothing available in the trim section of each store. Then, we saw the special order trim display at Lowe’s of exactly what we were looking for. The only problem was that Lowe’s sells these pieces in pre-made rectangles which wouldn’t work for our hallway. I told Anita that I could probably make the trim with my molding planes, so I snapped a picture of it and went to work.
I milled a piece of poplar 1/2″ thick x 1 1/8″ wide and drew the lines of the molding on the wood.
I then planed a 3/8″ rabbet a 1/4″ deep on each side of the stock with a couple of rabbet planes.
I then beveled the edges about 1/8″ with my block plane.
After the bevels were created, I used a small palm gouge to chisel a shallow channel down both sides of the molding.
This channel allowed my No 2 round molding plane a place to ride to create the cove on the sides.
I then used a couple of hollow planes to create the bead on top of the molding. After the bead was created, I sanded the piece clean to remove any tool marks.
The final step was to miter the piece to see how it looked. I used my small miter box and miter trimmer to create perfect 45 degree angles.
I have to say, it’s pretty damn close to the display piece at Lowe’s. Now I’ll have to figure how many linear feet Anita will need to create the rectangular boxes down the hallway. I’m glad I figured out how to create the molding as it’s a bunch of fun to make.
This is a typical situation with a “skottbenk” used with at “skottokse” (the handplane) for shooting the edgde of a long board. Photo: Roald Renmælmo
When I started this blog I wanted to get some focus on a type of workbench that where almost forgotten in Norway. I wanted to engage other craftsmen in Norway to search for old workbenches and to make their own and start to use them. I did not believe that this would gain interest among woodworkers in other parts of the world. About a year ago Dennis Laney wrote a post about the skottbenk on his blog: If you don’t know your hyvelbenk from a skottbenk – you should. It is not easy to explain the use of the bench and to translate Norwegian terms to English. Dennis wrote a new entry on his blog to explain how this skottbenk works: Skottbenk equals sticking board…
Who knew? I can buy my citric acid for derusting my tools straight from the grocery store. At $8.49/lb, I’ll have to see if it’s a better deal than eBay.
While scouring antique malls looking for tools, I ran across this nice rip saw stuck in the back corner of a booth. It’s a Disston D8 Thumb Hole saw and considering it’s age, it was in very nice condition. Even though it had some rust on the blade, I knew it would clean up just fine.
The first thing I did was take the saw apart and dip the blade in a bath of water with food grade citric acid. I let it sit overnight allowing the acid to eat all the rust off the blade.
While the blade cooked, I focused my attention on the handle. Using Soy-Gel paint stripper, I cleaned all the gook and grime off the apple wood handle using a steel wool pad.
Here’s the handle wiped off after just a few minutes of paint stripper on it.
In the morning, I took the blade out of the bath and wiped it down with a paper towel. The blade was clean from rust, but was dull from the cook. I grabbed some drywall sponges and lightly sanded the blade. I then polished it with a variety of Sand Flex sanding sponges.
Here’s the blade after the polishing was done. You can see how the blade was slightly pitted. Unfortunately because of the pitting, the etching was no longer present, but the saw will still make a fine user.
After applying a couple of coats of shellac to the handle and putting it back together, the saw looked far better than when I bought it.
Here’s a close up of the handle. You can see the crack at the bottom of the handle. A little bit of glue was all that was needed to fix it.
The saw looked nice, but it needed to be sharp in order to work well. I took some Dykem layout fluid and spread it over the teeth of the saw so that I can see what I was doing better when filing the teeth.
I used a file to joint the teeth flat then filed the flats away with a triangular file. If you’ve never attempted to sharpen a saw before, I recommend you start with a rip saw like this. It’s a pretty simple saw to sharpen and the big teeth are easy enough to see. For a video on how to sharpen a saw, you can look at this YouTube video of Frank Strazza of the Heritage School of Woodworking. The video is a little long, but Frank does a good job explaining the steps.
Here are the teeth after I sharpened the saw. I’m not the world’s best saw sharpener, but I can get the job done.
Here’s a picture of the saw performing in mid cut. It stayed straight on the line and cut the wood like butter.
Finally I made a short video showing the saw’s performance.
Soy Gel is a 100% soybean based paint remover that has no toxic fumes and is really safe for the environment. I bought a bottle for my wife about a year ago so she could remove the paint off a piece of furniture she bought. I rarely repaint planes so, I never gave much thought about using it to remove the black japanning from a plane. Well apparently according to the post, it does the job quite well.
So, this weekend while I was busting my knuckles cleaning up the bed of an old Stanley Liberty Bell plane with steel wool, I opened up my cabinet to grab another piece of wool when my bottle of Soy Gel was staring at me right in the face. I looked at the bottle, then looked at the plane bed and thought “I wonder if it would help”?
I grabbed the bottle, squirted some on the bed, spread it around with my steel wool pad and let it sit there for a bit. Sure enough after just a few seconds, the dirt and grime just melted away when I rubbed it off with the steel wool.
I was amazed it worked so well. Then I was angry at myself that I didn’t think of it any sooner. How could I be so blind? Here’s the before and after shot of the side of the plane.
All these years of busting my knuckles trying to clean up the wood from old planes with nothing but steel wool and a whole bunch of elbow grease, and I could have just been using Soy Gel the whole time to make the job a whole lot easier. Oh well, I learn something new everyday. Here is a couple of shots of the plane all cleaned up. I guess someone liked my cleaning job as the plane sold within a few hours of being listed on eBay.