Early Taylor Bar Clamps

Every 4th of July I travel to Adams County, OH to attend an antique tool auction held by the Amish. It’s been something I’ve been doing for the past fifteen years and it has become a tradition for me as something I always looked forward to all year. Every year I would come home with a ton of tools I picked up at a bargain hoping to make a little cash selling them on eBay. It started to decline the past couple of years and I was afraid it might end as the tools weren’t much to choose from and the quality of them were lacking. Well with the economy in the tank and $4 gas hitting the streets, the auction didn’t happen this year.

Bummed out, my wife asked if I wanted to go to an antique mall on the other side of Cincinnati and look around. We go there from time to time as she looks for things to sell in her booth. I rarely if ever find tools so I wasn’t too optimistic finding anything.

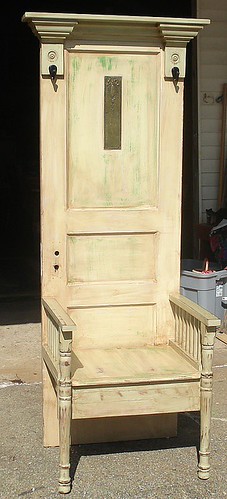
After we arrived, I spotted these clamps on the floor of a booth. They intrigued me because while I’ve seen old clamps before, I’ve never seen a clamping action like these. They worked off a cam action from the handle. As you pull the handle up, the shell shaped curve pushes the pad out. I debated getting them because old bar clamps are not very collectible and I really didn’t need them. Plus they were $22.00 a piece. But my wife said if I wanted them I should get them because the next time we were here, they’d be gone. So I used my wife’s 10% vendor discount and picked them up.

These are clamps after I dipped them in citric acid/water mix and cleaned the rust off with steel wool. The clamping range is about 20″. I thought it was a little odd that they weren’t designed to hold 24″ between center but I guess the inventor had his reasons.

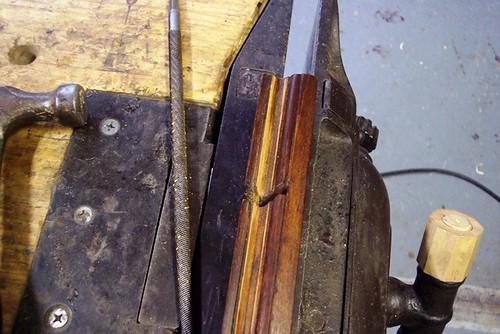
Here’s the detail of the handle. You can see how the pad gets pushed out as the handle is raised. It’s simplicity is what makes the design so beautiful.

You can clearly see “The Taylor” on the face. I googled “taylor clamp co” and came up with www.jamesltaylor.com a manufacturer of mass production clamping and gluing machines. After I cleaned the rust off the bar I could faintly see the “The Taylor Manufacturing Co, Poughkeepsie, NY” so these clamps are obviously there’s. However, I was left with a big question.

l

On the jaw there was a patent date of Jan 2, 1900. On the Taylor website they claim that the company was founded in 1911. How were these clamps patented in 1900 while James Taylor didn’t start his company until 1911? obviously John Taylor must have been a sole proprietorship for a few years tinkering around with designs before developing the typical design used today. Are these clamps some sort of prototypes or first edition models?

You can faintly see the logo “The Taylor” in an oval logo very similar to the Taylor logo used today. John must have simplified his logo when he incorporated in 1911. I looked all over their website the to see if they mention these style of clamps with no luck. I even tried searching the US Patent office on the internet for more information but came up empty.

James L. Taylor Manufacturing Co. Inc logo used today.

While the origins of these clamps remains a mystery, the real question is how do they perform? The answer is amazingly well. While they may not provide as much torque as typical bar clamps, they are extremely quick and easy to use. Where they excel is in gluing up cabinetry where you need speed on your side. Simply put the clamp around the stock and pull the handle up. I clamped a piece of wood to my workbench and tried moving it with no luck. They hold rock solid.

Another advantage with these clamps is they would appeal with people with arthritis. Often the screw handle on regular clamps can be tough to tighten with people who suffer from arthritis. With these clamp, they can easily tighten them up. There may be a real market for these clamps being manufactured and sold today as woodworkers are getting older every year. Hmmm….

Modern Moxen Vise

A few months ago I wrote about how I attached a Micro Fence to my Bosch Colt plunge router. The link is below:

http://wp.me/p1gfza-cD

The tool works great but I wished I had some sort of guide system to make routing tenons even easier. Then one day as I was cleaning up my shop, I came across a Popular Woodworking magazine I had stashed away. The issue was from Oct, 2012 and in it was an article about making an improved Moxon vise the writer called Gizmozilla. When I saw it I thought to myself “oh yeah, I forgot about that thing”. I stashed it away because I was planning on making it some day and since that I had the Colt plunge router, now would be a perfect time.

The writer of the article, Kenneth Speed, used maple to laminate a beam that was 3 1/2″ square by 4 feet long. I knew that was a little too big for me since I was using a small trim router instead of a big plunge router, so I milled a 4×4 to 2 1/2″ x 3″ x 3′ long.

I then built the trough system that would guide my Micro Fence fence. This was the most difficult part of the project because I needed to make sure that the trough of my fence was loose enough for my router to move freely, but not too loose that it would create slack completely defeating the purpose of using the Micro Fence. After a couple of attempts, I had the right thickness to make it work.

I then had to route a couple of grooves in the beam to accept T-tracks that I bought from Rockler. Those things didn’t come cheap as I paid nearly $20 a piece for them but I wanted to have adjustable stop blocks the same way Kenneth had. I also attached feet to the ends by laminating a couple of 3/4″ scrap plywood together. I have a couple of holes drilled through my workbench about four feet apart so I can hold the fixture to my bench with a couple of hold fasts.

Kenneth used store-bought knobs to hold the stops tight to the fixture but, I wanted to try to make my own so I grabbed some scrap maple, a 1 1/4″ hole saw, and drilled out six plugs to create little knobs.

Once the plugs were cut, I traced around a 1/4″ nut with a pencil and gently carved out the inside with a 1/4″ chisel.

After the area was all carved out, I inserted a nut and shaved three sides of the circle on my disc sander to create a soft triangular-shaped knob. Once all six knobs were made, I used some five-minute epoxy and glued the nut inside the knob so it wouldn’t slip out during use. The bolts that they are threaded to are nothing more than 1/4″ carriage bolts with modified squared off heads to pass through the T-track.

Kenneth used Jorgensen hold-down clamps and a fancy caul system to hold the wood to the fixture however, I wanted to keep the fixture as simple (and cheap) as possible so I simply use a couple of Jorgensen F-style clamps to hold the wood to the fixture.

Everything looks good but I needed to see how well it worked. I took a couple of pieces of scrap wood and placed a loose tenon over the joint and marked where I wanted the tenon.

I transferred those marks around the edges of the wood so I could then gauge where the router needed to cut. I also marked the “face” on each piece so I knew in which direction the piece needed to be place on the fixture so that the face of the boards would line up evenly.

I set the stop blocks where they needed to be and made a test cut while placing the face of the work piece on the inside of the fixture. Everything looked good on both pieces and fitted together nicely. This joint was super fast and easy to create!

The beautiful thing about using the Micro Fence is that if I do need a thicker tenon, I simply use the brass stops on the sliding bar of the fence to limit the travel of the router on the Y axis.

I now have accurate three-dimensional cutting availabilty using this fixture. The fence stops act as the X axis, the Micro Fence guide rails act as the Y axis, and the plunge router base acts as the Z axis.

Much like Kenneth’s Gizmozilla, the fixture can be used as a regular Moxon vise for cutting dovetails by hand or with a power router when I use my Keller Dovetail System.

This was a super simple fixture to make and it has already been very useful in my shop building a couple of outdoor benches. I’m sure it will be the most valuable jig/fixture I have ever made.

Is Wood Magazine Going Shabby Chic?

I received the latest issue of Wood magazine yesterday and noticed a project on the cover that I had seen before but with a different twist. They showed an entry bench made from an oak door. I recognized the project because I’ve seen it done a few times before but only with an old door that was repainted.

The style is called shabby chic and is very popular among women. The idea is to take old items, commonly referred to as “junk”, and repurpose them into modern hip accessories or furniture for your home. There are thousands of websites and blogs as well as a number of magazines that focus on the shabby chic style. There are even a couple of TV shows where the hosts’ buy old items and use them as design elements around the home. Below are some old shabby chic doors repurposed into benches.


This one is very similar to Wood magazine’s cover photo.

I know all about the shabby chic style from wife Anita. She has a business called Bella Chic Decor where she finds old pieces of furniture and paints them with chalk paint to give them an old worn look. Sometimes she’ll ask me to repurpose an item she bought into something more useful. In fact, I wrote a blog about repurposing an old door into a headboard a few months ago.

https://mvflaim.wordpress.com/2012/07/10/turning-a-headboard-into-a-bed/

I don’t have any problem with shabby chic stuff even though it’s really not my cup of tea as it tends to be very femine. You may not be crazy about it either, but chances are your wife, sister, or daughter probably likes it. It’s all the rage these days and offers a cheap alternative from buying mass-produced laminated press board crap that you’ll find in retail stores. Often old antique furniture is solidly built, but just needs to be updated a little bit to fit with the modern decor of homes.

When my wife saw the cover of the magazine she asked, “why didn’t they just use an old door”? That’s a good question. The editors at Wood magazine estimated the cost of building the bench at $375. One could buy an old door on Craigslist for about $20.00, use poplar hardwood and birch plywood to build the sides, paint everything a neutral color, and end up spending about $100 for nearly the same look.

I can imagine the editors of Wood magazine sitting around in a meeting room asking each other if they should just use an old door and paint it. They probably realized that woodworkers love wood grain and consider painted furniture sacrilege. In fact in the first paragraph of the article, they mention that one could make this project using an old door from a salvage yard. It’s just a shame that they didn’t show a picture of a bench made from an old door to give the reader an idea of how it looks.

Restoring a Hand Saw

A few weeks ago, while at the Tri-State Antique Show in Lawrenceburg, IN, I came across this old Disston saw. It was in decent shape barring a little rust but the blade was straight. The dealer was only asking $8.00 for it so I decided to buy it and see if I could bring it back to life.

Overall, the saw was in pretty good condition, it just had a few issues with the handle. The top of the tip was chewed up and a part of the side was busted on the other side. I grabbed a piece of beech scrap wood and cut out a couple of blanks to fix the handle. The beech came from an old jointer plane I bought decades ago. It was missing the blade so I ripped it straight down the body into 3/4″ planks and have been using it to repair other tools for years.

I could have cut off the entire tip of the saw and glued in a new piece of wood but I decided just to shave the worn area away with a chisel. This way, the other side of the handle would be left undisturbed.

After I carefully cut out a blank that matched the angle of the shaven off area, I glued it in place with some woodworkers glue.

After the blank was glued and had dried, I used files and rasps to bring it to final shape. I wanted to make sure the wood matched the original shape which was easy because the other side was still there.

Next I flipped over the handle and started working on the part that was missing from the front of the handle.

I cut another piece off my scrap beech and glued it to the handle then shaped and sanded the wood.

The handle came out well but the contrast between the old beech handle and the replaced beech was pronounced. I decided to darken the entire handle down so it would all match. The first thing I did was tone down the wood with walnut aniline dye. I rubbed a couple of coats on it with a sponge and let it dry. I then applied a light coat of dewaxed shellac so I could wipe on a couple of coats of General Finishes Walnut gel stain.

While the handle dried, I focused on the blade. This was the easy part. I simply soaked the blade in a citric acid/water solution for a couple of hours and wiped it clean.

After I wiped it off I used some fine grit sanding sponges and cleaned up blade a little bit more. I also cleaned up the saw nuts with some 000 steel wool.

The saw turned out really well. I just now need to sharpen the blade. I’m no expert on saw sharpening so there’s no sense showing you how I’ll sharpen the saw because I’ll just be following someone elses instructions. There are a bunch of videos on YouTube on saw sharpening so pick your favorite and have at it however, for the money, Ron Herman’s “Sharpen Your Saws” by Popular Woodworking is worth every penny. Ron is considered to be one of the foremost experts on hand saws in the country and his DVD showed me everything I needed to know how to make a saw sing. http://www.shopwoodworking.com/sharpen-your-handsaws-w5169

My Shop Assistant Isn’t Very Helpful

Yesterday while changing the blade on my band saw, one of the little knobs that hold the top and bottom doors closed, fell out of my hand onto the floor.

I’ve never been a big fan of these knobs because they are so small, they slip out of my hands every time I hold them, but they do work. Just my luck when the knob hit the floor, my dog Bentley ran over to it like it was a toy and started playing with it, sticking it in and out his mouth like a ball. After I was finished changing the blade, I asked Bentley were the knob went. He just looked up at me like “what knob?” I spent a half an hour looking for that stupid knob all over my shop, underneath all my benches, tools and everywhere else in the basement. I keep my shop floor pretty clean so it shouldn’t have been too hard to find a piece of black plastic.

Without that knob, It’s hard for me to keep my top door of my band saw closed. I had to settle with some crappy little nut until the knob reappears (hopefully soon). All I know is if Bentley poops out a little black triangle in the next couple of days, I’ll know where the knob went.

Anyone need a saw?

What do you call it when you have twelve hand saws, a circular saw blade, a clock movement, and an old pallet? Answer; a $350.00 clock.

I saw this work of art  while I was at The Springfield Antique Show Extravaganza in Springfield, OH today. Before you laugh, a young lady walked into the booth while I was taking the picture and told the vendor, “I love it, it’s such a cool idea.” The vendor selling it had two of them available for $350.00 each. I’m not sure if she has ever sold them in the past, but she claimed she gets a lot of compliments on them.

Don’t get me wrong, there’s nothing wrong with using old saws that just sit around collecting dust. It just makes my stomach churn when I see nice tools used as decoration when they could be used as what they were intented to do. I checked the saws she used and most of them weren’t of any real value although she did use some old Disstons. Most of the Disstons had handles that were chipped or the saw nuts were missing.

I guess the joke’s on me. Maybe buying old saws, cleaning them up and selling them on eBay for $20.00 – $30.00 is a waste of time. I should just make these kind of clocks instead, but don’t count on it.

Restoring a molding plane

I’m constantly buying old molding planes at local auctions. I can usually pick them up for a song since they really don’t attract much interest from tool collectors. They come in various forms and sizes but the most common in the marketplace are hollows & rounds and beading planes. This plane is a cove and bead. A sweet little plane that is useful for adding little detail moldings on cabinets.

This plane is overall in good shape, just a little dirty and neglected. But a little elbow grease and a citric acid bath, it will tune up in no time.

The blade has some surface rust but no serious pitting. I dipped it in a citric acid solution which contained a tablespoon of citric acid with five cups of warm water. My trough is nothing more than a scrap piece of plastic gutter with an end cap glued to each end. It works well and hasn’t leaked in the past three years.

After the blade sat in the solution for a few hours, I scrubbed it clean with a piece of steel wool and washed it off in the sink. I then sharpened the back by lapping it on some water stones.

As far as the body, I didn’t do too much. I simply wiped it with 00 and 000 steel wool then applied a couple of coats of mineral-oil/orange-oil/beeswax solution to the body and wedge. I didn’t rub steel wool on it too much as I didn’t want the plane to look new. Since it’s over a hundred years old, it should look like it’s that old but in working order.

The biggest obstacle that you’ll face tuning up a molding plane is matching the blade to the soul’s profile. After decades of the wood expanding and contracting, losing moisture and drying up, it’s not unusual for the soul to change. This plane’s blade doesn’t match up perfectly to the soul. ideally the blade should protrude equally along the soul. Since it doesn’t I have two options. One is to reshape the blade to match the plane’s soul. Or two, reshape the soul a little bit to match the blade. The first option is the best since you don’t want to weaken the soul by removing wood away but in this case, so little wood needs to be removed, that option two would be much quicker.

I needed to remove a little bit of wood by the end of the bead so I took a bastard file and shaved it down. I periodically checked the blade in the plane to make sure I had a constant protrusion along the soul. Once it did, I was done.

Next I needed to see how the plane performed. I grabbed a piece of straight grain poplar and started planing. The plane shaved off perfect shavings with no clogs.

This is how the molding would look when installed. You can see how the shadows bring out the curves of the molding. A nice little detail that adds a touch of class to cabinetry.

The plane looks nice too. It still has a nice warm dark color and plenty of patina to show off its age. I could have bought a router bit to do the same thing, but where’s the fun in that?

Beware of PayPal

I was getting lunch today and handed the cashier my PayPal debit card to pay. She handed it back to me saying it was declined. I thought it was odd since I knew I had some money in it when I sold a bunch of tools last month. When I got home today, I went online to see what the problem was. Some asshole in Brazil got a hold of my account information and started charging a bunch of charges to AUTO POSTO and Rodeo Bar in Brazil under my account.

I immediately called PayPal to dispute the charges. There are a total of ten charges in the past two days and the bastard took $587.00 from me. PayPal told me that they filed a dispute on my behalf and I should get my money back within a couple of days. They also cancelled my card and will send me out a new one tomorrow.

I can’t figure out how the hell someone got my account info. I’m very careful not handing out any of my information to anyone under any circumstances and my PayPal password is not a simple one. I keep thinking about odd things that happened to me in the past few weeks and how someone could have gotten info from me. The only thing I can think of is a few weeks ago, a guy in Brazil with zero feedback placed a bid on one my auctions, then emailed me asking to cancel the transaction. I went into eBay and cancelled it a few days later but can’t figure out how he would have been able to get my account info from that. It may be just a coincidence but I’m done shipping international in eBay. So if you sell on eBay and have someone with zero feedbacks ask you to do something for them, don’t.

I think it’s bullshit that PayPal didn’t freeze my account when the first transaction came through from brazil let alone ten. Any other credit card company would have blocked my account immediately. Once I get my $587.00 back in PayPal account, I’m withdrawing it immediately and sticking it in my bank.

A $6.00 Side Table

This is the side table I just made last week painted and all finished. My wife painted it with chalk paint and added a stencil to to the top. I think it turned out really well. It was made with from a 2×8 southern yellow pine board I bought from Lowe’s for $6.00. We plan on giving it away to our local PBS station so they can auction it off in their annual pledge drive Action Auction next month. We’re going to split the donation; I as the builder, MVFlaim Furnituremaker and my wife Anita as the painter, Bella Chic Decor. It’ll be intersting to see how it does.