Anyone need a saw?

What do you call it when you have twelve hand saws, a circular saw blade, a clock movement, and an old pallet? Answer; a $350.00 clock.

I saw this work of art  while I was at The Springfield Antique Show Extravaganza in Springfield, OH today. Before you laugh, a young lady walked into the booth while I was taking the picture and told the vendor, “I love it, it’s such a cool idea.” The vendor selling it had two of them available for $350.00 each. I’m not sure if she has ever sold them in the past, but she claimed she gets a lot of compliments on them.

Don’t get me wrong, there’s nothing wrong with using old saws that just sit around collecting dust. It just makes my stomach churn when I see nice tools used as decoration when they could be used as what they were intented to do. I checked the saws she used and most of them weren’t of any real value although she did use some old Disstons. Most of the Disstons had handles that were chipped or the saw nuts were missing.

I guess the joke’s on me. Maybe buying old saws, cleaning them up and selling them on eBay for $20.00 – $30.00 is a waste of time. I should just make these kind of clocks instead, but don’t count on it.

Restoring a molding plane

I’m constantly buying old molding planes at local auctions. I can usually pick them up for a song since they really don’t attract much interest from tool collectors. They come in various forms and sizes but the most common in the marketplace are hollows & rounds and beading planes. This plane is a cove and bead. A sweet little plane that is useful for adding little detail moldings on cabinets.

This plane is overall in good shape, just a little dirty and neglected. But a little elbow grease and a citric acid bath, it will tune up in no time.

The blade has some surface rust but no serious pitting. I dipped it in a citric acid solution which contained a tablespoon of citric acid with five cups of warm water. My trough is nothing more than a scrap piece of plastic gutter with an end cap glued to each end. It works well and hasn’t leaked in the past three years.

After the blade sat in the solution for a few hours, I scrubbed it clean with a piece of steel wool and washed it off in the sink. I then sharpened the back by lapping it on some water stones.

As far as the body, I didn’t do too much. I simply wiped it with 00 and 000 steel wool then applied a couple of coats of mineral-oil/orange-oil/beeswax solution to the body and wedge. I didn’t rub steel wool on it too much as I didn’t want the plane to look new. Since it’s over a hundred years old, it should look like it’s that old but in working order.

The biggest obstacle that you’ll face tuning up a molding plane is matching the blade to the soul’s profile. After decades of the wood expanding and contracting, losing moisture and drying up, it’s not unusual for the soul to change. This plane’s blade doesn’t match up perfectly to the soul. ideally the blade should protrude equally along the soul. Since it doesn’t I have two options. One is to reshape the blade to match the plane’s soul. Or two, reshape the soul a little bit to match the blade. The first option is the best since you don’t want to weaken the soul by removing wood away but in this case, so little wood needs to be removed, that option two would be much quicker.

I needed to remove a little bit of wood by the end of the bead so I took a bastard file and shaved it down. I periodically checked the blade in the plane to make sure I had a constant protrusion along the soul. Once it did, I was done.

Next I needed to see how the plane performed. I grabbed a piece of straight grain poplar and started planing. The plane shaved off perfect shavings with no clogs.

This is how the molding would look when installed. You can see how the shadows bring out the curves of the molding. A nice little detail that adds a touch of class to cabinetry.

The plane looks nice too. It still has a nice warm dark color and plenty of patina to show off its age. I could have bought a router bit to do the same thing, but where’s the fun in that?

Beware of PayPal

I was getting lunch today and handed the cashier my PayPal debit card to pay. She handed it back to me saying it was declined. I thought it was odd since I knew I had some money in it when I sold a bunch of tools last month. When I got home today, I went online to see what the problem was. Some asshole in Brazil got a hold of my account information and started charging a bunch of charges to AUTO POSTO and Rodeo Bar in Brazil under my account.

I immediately called PayPal to dispute the charges. There are a total of ten charges in the past two days and the bastard took $587.00 from me. PayPal told me that they filed a dispute on my behalf and I should get my money back within a couple of days. They also cancelled my card and will send me out a new one tomorrow.

I can’t figure out how the hell someone got my account info. I’m very careful not handing out any of my information to anyone under any circumstances and my PayPal password is not a simple one. I keep thinking about odd things that happened to me in the past few weeks and how someone could have gotten info from me. The only thing I can think of is a few weeks ago, a guy in Brazil with zero feedback placed a bid on one my auctions, then emailed me asking to cancel the transaction. I went into eBay and cancelled it a few days later but can’t figure out how he would have been able to get my account info from that. It may be just a coincidence but I’m done shipping international in eBay. So if you sell on eBay and have someone with zero feedbacks ask you to do something for them, don’t.

I think it’s bullshit that PayPal didn’t freeze my account when the first transaction came through from brazil let alone ten. Any other credit card company would have blocked my account immediately. Once I get my $587.00 back in PayPal account, I’m withdrawing it immediately and sticking it in my bank.

A $6.00 Side Table

This is the side table I just made last week painted and all finished. My wife painted it with chalk paint and added a stencil to to the top. I think it turned out really well. It was made with from a 2×8 southern yellow pine board I bought from Lowe’s for $6.00. We plan on giving it away to our local PBS station so they can auction it off in their annual pledge drive Action Auction next month. We’re going to split the donation; I as the builder, MVFlaim Furnituremaker and my wife Anita as the painter, Bella Chic Decor. It’ll be intersting to see how it does.

Making a Shaker Table from a 2×8

Earlier this week I grabbed a 2×8 that was 8 feet long for $6.00 at Lowe’s with the intentions of making a shaker table out of it. I’ve made a lot of furniture out of Southern Yellow Pine dimensional lumber over the past couple of years. One of the best things I like about it is that it’s dirt cheap. The other is that it comes 1 1/2″ thick so when making legs, I don’t have to laminate two 3/4″ boards together exposing a glue line down the leg. The biggest downside is that the wood is very soft and easily dents however, lately I’ve been building things to look old, and a few dings and dents will only add character to the piece.

Making the legs of the table is a synch. Rip four pieces 1 1/2″ wide x 1 1/2″ thick. The next is ripping down the stock to create the carcass of the table. Because the 2 x 8 is exactly 1 1/2″ thick, getting two pieces that are 3/4″ in thickness is next to impossible. I settle for ripping it down the middle and yielding two pieces 5/8″ thick after I clean them up in the surface planer.

After I rip the stock to 5 1/2″ wide, I don’t just rip the piece all at once on the bandsaw. I set my table saw up to rip it in the middle and run a kerf on each side of the board.

Then I take it to the band saw and rip the rest of the way. This does several things. One, it saves my band saw motor as it doesn’t have to fight ripping five and a half inches of wood. Instead it only has to rip about 2 1/2″. Plus the kerf of the table saw blade creates a channel for the band saw blade to ride in so I don’t get blade drift. It’s also much faster than ripping 5 1/2″ and it also creates less dust.

Once I have my side and legs milled, I need to route the joinery to attach everything together. Using my handy-dandy Colt plunge router, I route all the mortises in the legs and sides to accept loose tenons. The process is so fast and simple I wished I would have created that Micro Fence jig ten years ago.

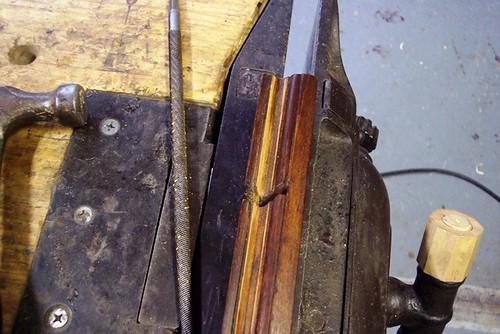
After the joinery was cut, I tapered the legs with my taper jig.

For the top I wanted to use 3/4″ wood as 5/8″ would be a little too thin. This is okay because I still need stock for the drawers which will be 1/2″ thick. So I simply rip the next pieces at 7/8″ on the table saw and follow-up on the band saw like I did previously.

The parts came out clean but the two pieces for the top were a little narrow. Together they were about 15″ but I needed the top be 16″ wide so I grabbed a piece of off-cut scrap and glued it in the middle.

After the top was glued, I flattened it with my 16″ surface sander and beveled the edges with a 45 degree chamfer router bit.

I needed to assemble the carcass so I dovetailed the rail on top of the drawer and loose tenoned the bottom rail to the two front legs.

The carcass fitted together nicely so I sanded the parts with 150 grit sandpaper and then glued it all together. Now I needed to work on the drawer.

The drawer sides and back are made with the 1/2″ stock. I planed a groove down each side and the back of the drawer front. I then cut them to size and routed a dado in the side to accept the back.

I cut half blind dovetails into the drawers and used my Colt plunge router to rout the majority of the waste and cleaned out the joint with chisels. Luckily I had a piece of scrap plywood for the drawer bottom lying around so I didn’t have to buy more wood. After I cut all the joinery for the drawer, I glued it all up.

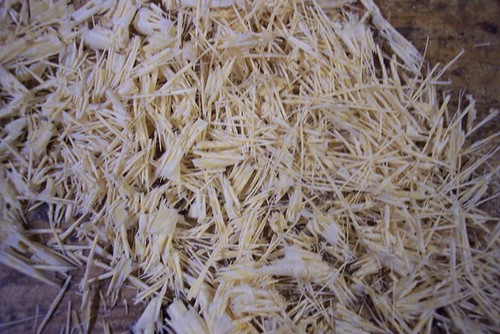
As far as scrap goes, this is about it. Nearly everything from that 2×8 was used when I finished installing the drawer runners. Luckily I didn’t have any major screw ups where I would have to use more lumber because I didn’t have it.

The table came out pretty nice for $6.00. I plan on painting it (or my wife will) and give it away to my local PBS station. Next month they have an on air auction they call “Action Auction” where they auction off items from local businesses. I participated in it a couple of years ago donating this same shaker table only out of cherry. Back then, the table sold for about $135.00. It’ll be interesting to see where this one ends up. But for $6.00 and a few hours of work, it’s a good investment for getting my name on TV.

Making loose tenons

I recently outfitted my Colt plunge router base with a Micro Fence and I plan on using it a lot so I need a way to make a lot of loose tenons quickly.

When making the tenons, I grab some scrap maple I have lying around, rip it down to 3/8″ on the band saw and plane it to size on the planer.

The router bit I use is 1/4″ spiral up cut bit so the tenon stock needs to be 1/4″ in thickness to match the mortise.

Once I have the tenon stock sized, I run a veneering plane over both sides of the work piece to plane grooves into it. The grooves will give the glue a place to spread so that the tenon will fit in the mortise snuggly.

The router bit I use creates rounded ends in the mortise so I run the beading part of a 1/4″ beading plane over the tenon stock to round its sides.

Making the tenon stock is done, but now I need to cut them to length so I decided to quickly build a table saw sled with some more scrap wood.

I took a piece of 1/2″ plywood about 15″ long and laid it over my table saw with wooden runners in the dados of my table saw. I made sure the plywood was square to the saw and quickly glued and pinned the plywood to the runners.

I then cut up a 2 x 4 to create the front and back of the sled making sure that everything was square. The sled is not pretty but I don’t work for Woodsmith Magazine so I’ll skip the hard maple and cabinet grade plywood when building jigs. As long as it works, it’s fine by me.

I marked 3/4″, 1″, and 1 1/2″ lengths on the bottom of the sled to act as quick reference marks for certain sizes of tenons.

In no time at all, I can cut a multitude of precisely fitted tenons and store them in sandwich bags for easy storage.

Adding a Micro Fence to a Bosch Colt plunge router base

After the last month of cleaning and selling a bunch of antique tools on eBay I bought last fall, I was finally able to get back in the shop. For months I’ve always had a Festool Domino on my wish list but for the nearly $1000.00 for one, I never pulled the trigger. So after cleaning out my router cabinet one day, I came across the Micro Fence I bought about ten years ago collecting dust. I bought it for my Porter Cable laminate trimmer and had intended to use it for inlay work. Needless to say I never used the damn thing as I don’t do inlay work. So I got the idea of using it with a Colt plunge router base for routing mortises for loose tenon joinery.

The first thing I had to do was retro fit the jig to work with the plunge router base. I had to custom make the bar that attached the base to the jig so I used a piece of scrap maple I had lying around. I went to Lowe’s and bought 7/16″ round bar stock and fitted them into the sliding section of base.

Next I threaded the rod and reamed the holes with a 7/16″ 14 TPI tap and die set. Took me a while to get that done because everywhere I looked, didn’t carry both the tap and die. I ended up buying the die at Menards and the tap at O’Reilly’s Auto Parts. A big pain in the ass.

After the base had the bar installed, I lined up the Micro Fence to the base, marked where the holes went and threaded those holes with a 5/16″ tap.

The finished piece was tight and clean with the Micro Fence able to come into full contact with the plunge router base.

I got lucky as the handle from the base was able to extend all the way down without touching any part of the Micro Fence. The distance between the handle and the brass screw is about 1/32″.

Once I got the fence to work, I quickly realized that the center hole on the base was too big to work with plunging mortises into end grain as the work piece would literally fall through the hole. So I had to buy a piece of 1/4″ acrylic plastic and make a zero clearance insert for the base.

The base worked well but the only caveat is that when routing, there is no place for the chips to escape the hole. I have to plunge a little bit, then vacuum or pry out the shavings from the hole, then deepen the cut. Not a big deal to me as I always turn off the router in between depth settings anyway.

The Micro Fence works well but thought it would be nice to add a little light so I could see what I was doing better. I stumbled upon this little book light at Half Price Books for $5.00 and hoped I could get it to work on the router.

I snapped off the piece that slides in a book, grabbed some double stick turners tape and stuck the light on the back of the router. The thing works perfectly. Like it was made for the tool. It has an easy touch on, touch off switch which makes it slick to use.

Now I just needed to put the tool to work to see how it performs.

After cutting a couple of loose tenons, I laid out where I wanted them on the piece to be mortised.

A couple of reference marks and some quick passes with the router, I got a perfect fit. I think this will quickly become one of my favorite tools. Not as slick as a Festool Domino but for the price of the plunge router base at $100 and an unused Micro Fence, I think it’s a really good bargain.

Using a Circular Plane

If you get into woodworking much, you’re bound to get tired of always building square cabinets and start incorporating curves into your work. With modern woodworking equipment, it’s easy to cut shapes on the band saw then clean up the edges with random orbit sanders but if you’re a hand tool enthusiast, there is a long forgotten plane you should bring into your arsenal.

Stanley made several versions of circular planes in their hay-day. Out of the three versions; Stanley No 13, No 20, and No 113, the No 113 is by far the most commonly available in the marketplace. When Stanley introduced it, sales took off because its top center wheel allowed the user to adjust both sides of the bed at the same time.

The 113 came in different versions as the years went by. A side-wheel blade adjuster later became the more common Bailey blade adjuster. My personal No 113 is the side-wheel adjuster. It was the first 113 I ever bought and I tuned it up nicely. However many people prefer the Bailey adjuster since it works just like a normal bench plane.

By turning the top center wheel, you flex the bed in a concave or convex shape. The shape of the bed doesn’t necessarily have to be the exact shape of the wood you’re planing. The idea is to support the bed enough so that the blade will make constant contact with the wood.

The blade on a 113 is the same width of a Stanley No 3 so finding replacement blades shouldn’t be a problem. In fact, the mouth is a large enough at the base you can even use after market blades from Hock or Lie-Nielsen. However, after market chip breakers will not work because of the position of the frog adjustment tongue hole.

Using a circular plane is much like using a spokeshave. You want to plane down the grain as much as possible which means you’re going to constantly change the position of the plane on the work piece. If you plane up the grain, you’ll get blade chatter and tear out as the plane will literally bounce off the work piece. Skewing the blade at an angle will help produce a better cut as the blade will shear the wood fibers the same way a vegetable slicer cuts a cucumber.

Because of the divergent and changing grain, it’s critical that your blade be sharp. When planing, you’ll often produce two types of shavings. The first being regular shavings as you plane with the grain, then finer curly shaving as if you were planing end grain.

The true benefit of using a circular plane is the consistency you get when shaping the curve. Any high spots will get planed first revealing low spots in the work piece. After more planing, the piece will take on a consistent shape.

If worst comes to worst and you can’t remove plane chatter and tear out due to the grain rising, you can always remove it and smooth the shape with a sharp spokeshave.

One of the most common misconceptions about using circular planes is that people think that they only work with wood that is circular in shape. That’s simply not true. You can plane ovals and soft curves just as well. In fact a few years ago when I built my Roubo workbench, I used the No 113 to finalize and smooth the shape of my crochet.

The only manufacturer that makes a new circular plane nowadays is a company called Kunz which will run you $300 on Amazon. I have never used one so I can’t tell you how well they work. Neither Lie-Nielsen nor Lee Valley have versions of their own so buying an old Stanley may be your best bet. They run between $100-200 depending on condition. All I know is that if you’re in the market for one, buy it now before Chris Schwarz writes a blog about them making their prices double.

When it’s Time to Say Goodbye

When I was thirteen my Grandpa gave me this Stanley No 77 dowel making machine. I was just getting into woodworking at the time and the machine sitting on top of a cabinet in his shop caught my eye. When I asked what it did, he told me it makes dowels out of any wood you shove into the cutter. It was the coolest thing I had ever seen. A few months later he ended up giving it to me and I have kept it to this day as something I would never sell.

After being diagnosed with NMO/Devic’s Disease earlier this week, I started to put things into perspective. With treatment, I should be okay but the vision loss in my left eye and the tightness in my legs and groin may never get better. Nevertheless, I realize what is truly important in life.  I think of all the tools I own and the tools I’d like to buy if I’d just had the money.

I have wanted a Apollo HVLP sprayer for the past few years but they’re about $800-1200. Not the kind of cash I have just lying around. So I keep looking at some of the tools I own but never use to help pay for the sprayer. The dowel making machine is on top of the list.

I’ve kept the dowel machine for sentimental reasons along with its cool factor. The only problem, is that I never use it. I’ve owned it for over twenty-five years, probably longer than my Grandpa, and have only played with it a few times. I really don’t think my Grandpa used it either. My Grandpa was more of a mechanic than a woodworker restoring old Model T’s when he was alive. The only time he got involved with woodworking was when he repaired the spoked wheels on the cars. I never saw dowels lying around his shop where he was cranking them out with his Stanley No 77. So why did he own it? I have no idea. Maybe he picked it up at a yard sale thinking it would come in handy someday.

It may be the very reason he gave it to me. Since he never used it, he thought with my budding woodworking aspirations that maybe I would. But I never have. I don’t use dowels all that much, and when I do, I go to the store and buy some. Even if I needed a dowel out of a certain hardwood, I could simply turn it on the lathe. Not only that, but the only cutter I have for the dowel machine is 3/8″ so I’m screwed if I need a different size. Forget about buying additional cutters for it. They run about $100 a pop and a $100 will buy a whole bunch of dowels.

Screw it, I’m done. I’m selling the machine and using the money toward a HVLP sprayer. Something that I’ll actually use. I don’t think my Grandpa would care.