
If you get into woodworking much, you’re bound to get tired of always building square cabinets and start incorporating curves into your work. With modern woodworking equipment, it’s easy to cut shapes on the band saw then clean up the edges with random orbit sanders but if you’re a hand tool enthusiast, there is a long forgotten plane you should bring into your arsenal.
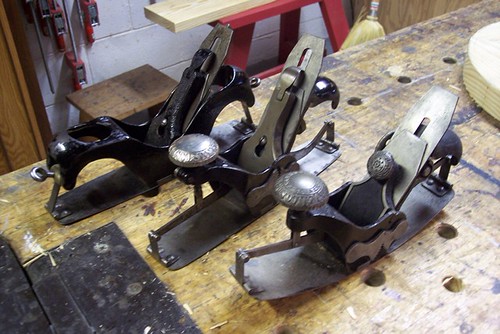
Stanley made several versions of circular planes in their hay-day. Out of the three versions; Stanley No 13, No 20, and No 113, the No 113 is by far the most commonly available in the marketplace. When Stanley introduced it, sales took off because its top center wheel allowed the user to adjust both sides of the bed at the same time.
The 113 came in different versions as the years went by. A side-wheel blade adjuster later became the more common Bailey blade adjuster. My personal No 113 is the side-wheel adjuster. It was the first 113 I ever bought and I tuned it up nicely. However many people prefer the Bailey adjuster since it works just like a normal bench plane.

By turning the top center wheel, you flex the bed in a concave or convex shape. The shape of the bed doesn’t necessarily have to be the exact shape of the wood you’re planing. The idea is to support the bed enough so that the blade will make constant contact with the wood.

The blade on a 113 is the same width of a Stanley No 3 so finding replacement blades shouldn’t be a problem. In fact, the mouth is a large enough at the base you can even use after market blades from Hock or Lie-Nielsen. However, after market chip breakers will not work because of the position of the frog adjustment tongue hole.

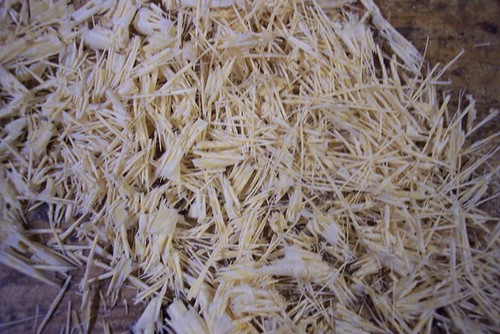
Using a circular plane is much like using a spokeshave. You want to plane down the grain as much as possible which means you’re going to constantly change the position of the plane on the work piece. If you plane up the grain, you’ll get blade chatter and tear out as the plane will literally bounce off the work piece. Skewing the blade at an angle will help produce a better cut as the blade will shear the wood fibers the same way a vegetable slicer cuts a cucumber.

Because of the divergent and changing grain, it’s critical that your blade be sharp. When planing, you’ll often produce two types of shavings. The first being regular shavings as you plane with the grain, then finer curly shaving as if you were planing end grain.

The true benefit of using a circular plane is the consistency you get when shaping the curve. Any high spots will get planed first revealing low spots in the work piece. After more planing, the piece will take on a consistent shape.

If worst comes to worst and you can’t remove plane chatter and tear out due to the grain rising, you can always remove it and smooth the shape with a sharp spokeshave.

One of the most common misconceptions about using circular planes is that people think that they only work with wood that is circular in shape. That’s simply not true. You can plane ovals and soft curves just as well. In fact a few years ago when I built my Roubo workbench, I used the No 113 to finalize and smooth the shape of my crochet.

The only manufacturer that makes a new circular plane nowadays is a company called Kunz which will run you $300 on Amazon. I have never used one so I can’t tell you how well they work. Neither Lie-Nielsen nor Lee Valley have versions of their own so buying an old Stanley may be your best bet. They run between $100-200 depending on condition. All I know is that if you’re in the market for one, buy it now before Chris Schwarz writes a blog about them making their prices double.

Hi Mike,
Thanks for the information on circular planes. Are they also called compass planes, or is that a different tool? Also, if someone gets a thicker aftermarket blade, the screw for the cap iron is likely to be not long enough. Is there a source for longer cap iron screws?
Chris
LikeLike
Another question, Mike: Do you have to relax the sole after using it, or is it okay to leave it arced?
LikeLike
Hi Chris,
Some people do call them compass planes. However, when I think of a compass plane, I think of a wooden bodied plane with a fixated arched body. Something like what Roy Underhill would use.
I own a Hock blade for my No 3 plane. I took out the blade to the Bailey version of the 113 and stuck in the Hock. The original cap iron screw worked fine.
I don’t think it matters to relieve the tension on the bed. I’ve been keeping my 113 in a convex shape for years without any troubes but laying it straight is probably not a bad idea.
Thanks
Mike
LikeLike
Those planes look so cool, i might have to get one now, before Chris Schwarz writes a blog about them 🙂
LikeLike
I have been using a number victor # 20 which tended to be cheaper, and it has worked well for me, but i have run into one major problem which is that it clogs a lot. Any suggestions here? Also curious if there is anything note worthy about what blade angle I should use, and if that is effected by planing primarily convex or concave curves. Been using my go two 30 degree for this maple project I have been working on.
LikeLike
I haven’t used a Victor No 20 but if you’re getting a lot of clogging even after you have adjusted the blade depth, you may need to file the mouth a little bit so that the shavings can come through. I’m not positive, but I don’t believe you can adjust the frog back and forth on that plane. If you could, that would more likely solve your problem.
I sharpen my blade no differently than any other bench plane I use. The biggest problem I run into is blade chatter as it cuts. A quick few strokes with a spokeshave will clean up the chatter. If you want to put a secondary bevel on the blade to attack the grain at a lower angle, that’s probably not a bad idea considering all of the changing grain.
LikeLike
Is there a way to adjust the 113 frog? Been using one for a couple of years and the other day I set the chip breaker about 1/16″ above the cutting edge. Clogged very quickly. I can’t see how it could be adjusted, but my eyes aren’t as good as they used to be.
LikeLike
No unfortunately there is no way to adjust the frog. The clogging is something I just deal with. The best way to reduce it is to take a thinner cut. You can also file the mouth opening to make it bigger, but being that it’s steel, that may be a tough thing to do.
LikeLike
Thank. I was afraid of that. Considered filing the throat, but I’d rather try that on a tosser rather than my user. Doing that by hand would be laborious but it can be done with a rotary file in a Dremel or Proxxon tool.
LikeLike
Excellent. Let me know how you make out. I may do it myself.
LikeLike
Certainly will. First need to pick up a tosser. Will look for a 113 body.
LikeLike