Building a Shed Part VII

My wife and I bought two old ten pane French windows a couple of years ago at a flea market. We knew as soon as we saw them that they would be perfect for the front of the shed.  Even though they were in good shape, I had to trim off the edges a little bit so I could work with them.

 photo 20160627_170253.jpg

After I took all the hardware off,  I covered all the screw holes and areas with damage with two-part wood putty. The stuff did the trick as it was hard as a rock the next day.

 photo 20160627_181449.jpg

These windows were very well made with through tenons. They appeared to be made from old growth white pine.

 photo 20160627_180427.jpg

Because we wanted the windows to actually function, I had to build a window frame for each window. I took a 2 x 8, sliced it on my band saw, and milled the lumber down to 3/8″ thick on my planer. I then started to make the bottom sill with a slight chamfer to allow rain water to run off.

 photo 20160702_135257.jpg

I built a frame to fit inside the window opening and sized the window to work inside the frame. I did a whole bunch of test fitting taking it back and forth from the shed. It took all day to make just one of the frames.

 photo 20160702_141520.jpg

Once the window fit, I attached boards inside the frame so that the window would have a nice place to sit when closed.

 photo 20160702_145800.jpg

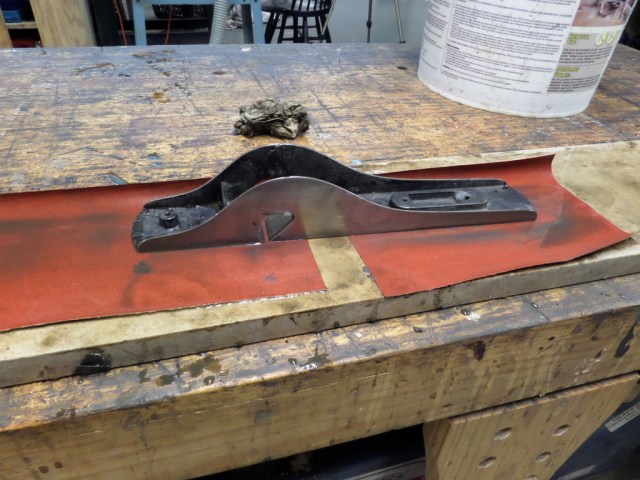
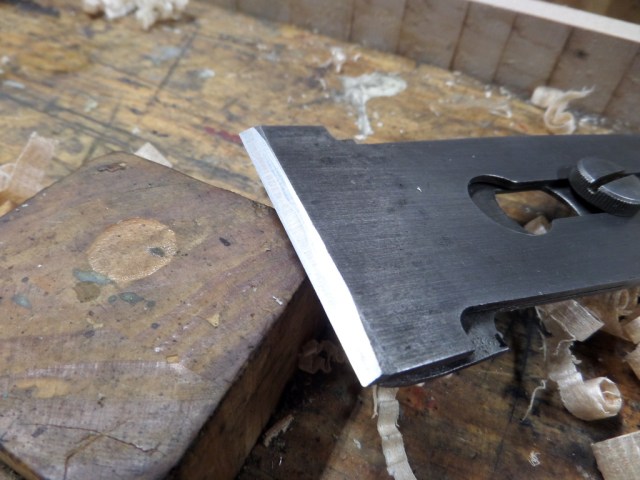
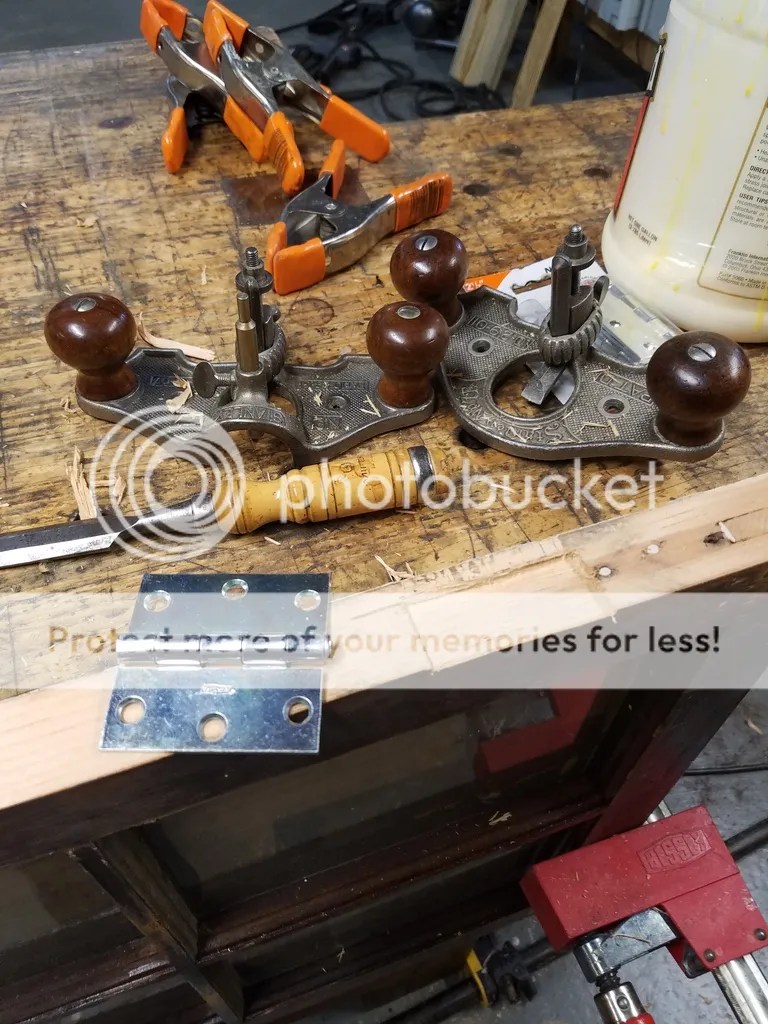
I bought 2 1/2″ wide hinges with removable pins and laid out the mortises. I cut the mortises with a chisel and a router plane to make the depth of the mortise the same throughout its length.

 photo 20160702_160117.jpg

I then test fitted the window in the frame before I went out to the shed to attach it.

 photo 20160702_163433.jpg

Being very patient, I fitted the window frame to the opening with wood shims and tested the window. It took nearly two hours to fit this window so that it would operate to my liking.

 photo 20160703_195057.jpg

Once the window fit well on the outside, I attached the frame to the opening with 15 gauge galvanized finish nails.

 photo 20160703_195103.jpg

The next day, I built and installed the other window. They both came out really well and open and close with ease.

 photo 20160705_191130.jpg

A simple scrap of cedar with a screw in the center acts as a latch for each window.

 photo 20160709_113911.jpg

Building a Shed Part VI

Getting the roof done, it was back to working with wood, which is what I like. I had already started a little bit of the siding trying to shore up the shed so I could get up on the roof without being nervous with all the rocking and rolling going on up there. All the siding I bought was 8″ wide, 10′ long tongue and groove pine board. I scarfed joint the back row pieces so that I could nail them together at a 2×4.

 photo 20160613_204151.jpg

By far the easiest part to side was the left side. We did that one week day after work before I started the roof. Since the shed is 10 feet wide, I simply nailed them to the frame with 2 1/2″ 15 gauge galvanized finishing nails.

 photo 20160614_171504.jpg

Fast forward a few days and after I shingled the roof, the majority of the siding was up. I originally started to use short pieces between the windows in order to use up some of the scraps. However, the more I thought about it, the more I realized that if I continued to do it this way, by the time I got down to the bottom of the window opening, with my luck, my bottom board wouldn’t line up with boards directly on top. Instead, I opted to cover up the window opening and later cut out where the window went. I did the side window the same way, but didn’t snap a photo of the before shot.

 photo 20160620_193200.jpg

I took my jig saw and ran down the opening cutting away the wood leaving about 1/4″ from the 2 x 4’s.

 photo 20160620_193818.jpg

Then, being a woodworker, I ran a flush trim bit on my router and routed the siding flush to the 2 x 4’s.

 photo 20160620_194144.jpg

Siding was nearly complete except for the small bottom piece to cover up the 2 x 8 flooring. Now it’s on to the windows.

 photo 20160620_200544.jpg


Building a Shed Part V

After building my scaffolding off the front of the shed, I went back to applying the roof tarp. This time it went much easier. I bought a slap hammer and slapped staples all over the place once I hammered down some button caps at the top and bottom of the roll.

 photo 20160614_120715.jpg

Once the one side of the shed was tarped, I moved the scaffolding over to the other side. It took me all day to get the shed tarped, but I did it safely which is all that matters.

 photo 20160614_150054.jpg

I went to Home Depot and bought seven packs of dimensional shingles and one pack of old style flat shingles. I used the flat shingles and laid the first row upside down and also up both sides of the roof with a 1/2″ hanging off the edge. I started on the back side of the shed because that is where the scaffolding was at the time, plus the fact that if I screwed up, it would be on the back.

 photo 20160618_103128.jpg

Laying the shingles was pretty straight forward. I started at the bottom laying over my upside down course. I hammered four 1 1/4″ roofing nails in each shingle making sure my shingles were staggered so that the seams of the second level didn’t run in line with the seam of the first.

 photo 20160618_112026.jpg

Every  few rows I would snap a chalk line to make sure my shingles were running straight.

 photo 20160618_115551.jpg

It took all day, but I finished shingling the roof. All I needed to do was the ridge vent.

 photo 20160618_164937.jpg

By this time I was so tired, I stayed focused on getting the job done and didn’t bother going inside, grabbing my cell phone to snap some pictures of laying the ridge vent. I finished up the roof by cutting through the top of the shingles with a utility knife, laying down the ridge vent, and shingling over top of it.

 photo 20160618_195419.jpg

This is the ridge vent from inside the shed. This will allow all the hot air inside the shed to  escape.

 photo 20160620_093155.jpg

The final shingle on the ridge vent was hammered down with 2″ roof nails and covered with roof cement.

 photo 20160629_180140.jpg

The next day, I went up the ladder to cut off the excess roofing shingles on the right side of the shed with my utility knife. Because I laid down my starter course first with the ordinary flat shingles that over hung 1/2″, it was easy to trim up the dimensional shingles flush to them.

 photo 20160619_092215.jpg

It’s all fun and games until the roof leaks. A few days later it started to rain. I went out to see how everything was holding up. Thankfully, there were no leaks and the water shed from the roof quite nice.

 photo 20160622_095833.jpg

Building a Shed Part IV

The day after we got the framing up, I was excited to get going on the roof. I knew I needed to put drip edge on the roof sheathing before the tar paper, but my wife, Anita, told me that I need to put the fascia boards on first.

 photo 20160612_121823.jpg

So, we went to Home Depot and picked up some 6″ wide cedar boards 10′ long and cut it to proper length. Since the roof was 16′ long, I had to scarf joint the boards in front with a 45 degree angle in case the boards shrink a little bit over time.

 photo 20160612_121838.jpg

I cut the side fascia at the same angle of the roof rafters and carefully fitted them together with tight joint at the top.

 photo 20160612_121845.jpg

After a few hours the fascia was up, so I started installing the drip edge. I watched a couple of YouTube videos to make sure I cut the drip edge properly so I could bend it at a 90 degree angle.

 photo 20160612_132416.jpg

The drip edge went up with ease. Now it was time for the tar paper. I grabbed the ladder and laid down the first row. I hammered down button caps about every foot on the bottom and about every three feet on the top.

 photo 20160612_183550.jpg

The first row was up and I started on the second row overlapping the first row about 4″. This is where the hell started. Because we built the rafters based on a 3, 4, 5 Pythagorean Theorem, the roof was at a 9 / 12 pitch. I couldn’t stand up on the roof because it was too steep nor could I manage to work on the second row off the ladder safely because of the slope of the yard. With all the trouble, I couldn’t tack down the second row without the tar paper getting ripples in it.

 photo IMG_20160612_204203.jpg

Completely pissed that I couldn’t do it, I removed all the tar paper from the roof. We decided to shore up the shed framing by putting up part of the siding. This way when I’m on the roof, the shed wouldn’t be rocking and rolling back and forth.

 photo 20160613_204140.jpg

Since my shed wasn’t going to have a soffit, I cut notches in the first row of the siding to slide past the rafters.

 photo 20160613_204151.jpg

It took a bit of time, but I was happy with the outcome. Any gap would be filled in with caulk. I ended the weekend getting a lot done, but felt completely defeated by not being able to tar paper the roof. I spent the night in a bad mood because I had no idea how I was going to do it.

 photo 20160613_204203.jpg

The next morning I went to work, and while walking through a Lowes, I spotted a book in the magazine section called “Building Sheds” by the Taunton Press. I skimmed through the book when I saw a picture of a couple of guys installing a roof on a shed. When I saw how they were doing it I thought to myself “of course”! The guys built wooden scaffolding platform on one side of the shed framing. I rushed down to the lumber aisle and figured out how much it would cost for two 2 x 12’s, four 2 x 6’s and a couple of 2 x 4’s. It ended costing $45.00 for all the lumber and $20 for the book. I got home that day and immediately started to build the scaffolding.

 photo 20160614_091110.jpg

I shored up the platform with a couple of 2 x 4’s cut at a 45 degree angle on one end. I screwed 2 1/2″ and 3″ screws throughout the scaffolding so I could stand on it without fear of it caving in. Once I was done building it, I climbed up the ladder and stood on it. It was perfect! Now I could lay the tar paper on one side of the roof, break down the scaffolding, and build it again on the other side of the shed to do the other side of the roof. I was so happy I figured out how to do it safely.

 photo 20160614_091118.jpg

Old Workbench Magazines

Some of the oldest woodworking magazines I’ve ever seen. Some of these go back to 1969 for a mere $0.35.

Everybody misses “Woodworking” and “Woodwork” magazines. How come no one misses Workbench?

image

This must be the days when boys wanted to build something instead of playing video games.

image

I bet this saw still works today.

image

Just think, you can still buy a circular saw today for $45.00. According to an inflation calculator, $45.00 in 1969 is worth about $300 today.

Building the Shed Part III

Remember this thing? Probably not. I started building this 10′ x 14′ shed late last year. I waited nearly two months for the deck boards to come in from Home Depot, but by the time they came in, it started to get cold for the year.

 photo 20151224_133134.jpg

Fast forward six months, I decided to get off my duff and start building the shed again. I went back to Home Depot and bought a bunch of 2 x 4’s and a few 2 x 6’s and framed out the walls.

 photo 20160610_203334.jpg

My wife bought a nice old sixteen pane window for the shed a couple of years ago and we decided to place it on the side of the shed. I measured it and framed it out making sure there was a little gap on all sides so it would be easy to install.

 photo 20160610_203348.jpg

The front of the shed will have two more old windows with big double doors in the middle. I laid the window in the frame to see where I wanted the header. We decided that all the windows and the tops of the doors will be placed at the same height.

 photo 20160611_073430.jpg

My buddy Dave came over in the morning one Saturday so that we could raise the walls and build the rafters for the roof. The four walls went up with ease and everything was plum and square. Good measuring on my part I guess.

 photo 20160611_092746.jpg

After we installed the top plate to the wall, we played around with angles for the roof until decided to use the 3′, 4′, 5′ Pythagorean theorem method. We cut a test rafter to see how it looked and cut out the birds mouth so that the rafter would fit on the walls nicely. I wanted the rafters to hang over the walls about one foot.

 photo 20160611_114503.jpg

Cutting the angles for the rafters was easy since there was a 31.62 degree measurement on my sliding compound miter saw. We cut all the wood and made seven rafters in about an hour.

 photo 20160611_131234.jpg

Since the the total length of the roof was 16′ long, we ended up making another rafter that sat in the middle of the shed so that the OSB plywood would have something to nail to at the end.

 photo 20160611_142744.jpg

I trimmed the OSB plywood to the proper size on the second row so that I would have about a 2″ gap at the top for a ridge vent. We got a boatload done in one day and I was happy I finally started to build the shed again.

 photo 20160611_151625.jpg


The Travesty

It’s sad to see such a fine saw in this condition. Maybe I should rescue it.

image

It’s been like this for over 30 years.
image

Alright, let’s play a game. If five people tell me to buy the saw, i’ll go back and get it. I already have two thumbs up from here and Facebook. I just need three more people.

UPDATE: I went back today and the saw was gone. Somebody either got a nice saw for a reasonable price, or they got something to hang over their fireplace. Haha.

New Lumber Rack

A couple of weeks ago I picked up a Port a Mate lumber rack on clearance for $20.00 at a local Lowe’s. Even though at the time, redoing my lumber area wasn’t top on my list, the price of the rack (originally $70) was too good to pass up.

SAMSUNG CAMERA PICTURES

My lumber area was basically trashed and had been for several years. I’d clean it up every once in awhile, but it always ended up being a catch all for junk I had lying around. The shelves I used for storing lumber was made from 2×4’s I built from a plan I saw in Shop Notes years ago. They did the job for the most part, but it still wasn’t very organized for storing my lumber. My wife, Anita, was glad I bought the lumber rack because she was sick of looking at the mess.

SAMSUNG CAMERA PICTURES

After Anita helped me clean up the area, I bought some Dry Lock mold inhibitor paint and we painted both the back and side walls. Then we painted white latex paint on top of it. I moved the cabinet that stored my finishes over closer to my work bench and moved the shelving rack from the back wall to the side. This gave me room to store a full sheet of plywood if I ever needed. I didn’t want the lumber rack to hang off my block wall because I was afraid the added weight may damage the foundation so, I notched out 2×4’s at the top and screwed them to the floor joists. I let the 2×4’s “hang” from the floor joist, then screwed one screw at the bottom of the grey block using plastic wall anchors. I then simply screwed the lumber rack onto the 2×4’s.

As you can see, I use the just-in-time inventory system when it comes to buying lumber. I really don’t have that much lumber to begin with as I buy what I need every time I build something. Any remaining wood is scrap that I can never throw away. The biggest piece of lumber I have is a slab of 2″ thick cherry I bought a couple of years ago during the Longest Yard Sale. I’ve had plans to build something with it, just haven’t yet. Maybe now I will since I can finally get to the board.


Restoring a Stanley No 10 Carriage Maker Rabbet Plane

Several months ago I picked up a Stanley No 10 Carriage Makers Rabbet plane with a welded sole at a local auction. I wanted to restore the plane and make it usable again so I took it all apart and soaked everything in a citric acid solution for a few hours.

SAMSUNG CAMERA PICTURES

Even thought the weld was done fairly well, the plane’s sides were no longer straight. Not the best situation for a plane that needs straight sides in order to cut a clean rabbet.

Fortunately, because the plane cracked only on one side, the bed was still relatively flat when it was welded back. If the bed would have been out of whack, I may have resorted to the garbage can as it would have been too much work to fettle flat.

I wanted the black removed from the sides as the previous owner painted the sides to cover up the weld. I spread some paint remover on it and let it sit for a few minutes before removing it with a putty knife. I then needed the sides to be straight so I started to fettle them with sandpaper on a marble base. Rubbing the bed back in forth, I could see the high and low spots on each side.

There was a lot of metal to remove, so I decided to take the bed to my stationary disc sander and carefully grind the bed using 80 grit sand paper.

SAMSUNG CAMERA PICTURES

Using the disc sander saved a lot of time, but it scratched the hell out of the surface. I made sure I moved the bed back and forth so that I wouldn’t do more damage than good.

Because the disc sander made a lot of scratches on the sides, I took the bed back to my marble base and used a variety of sand paper grits to remove as many scratches as I could.

SAMSUNG CAMERA PICTURES

I then focused on the bed, fettling it flat. I used a variety of sand paper from 150-400 grit. I worked on it for a few minutes until I was satisfied with the results.

SAMSUNG CAMERA PICTURES

Once the bed was done, I sharpened the blade using my Tormek sharpening wheel and water stones.

SAMSUNG CAMERA PICTURES

Since I ground some of the thickness of the sides away, you can see where the blade protrudes farther out of the side than normal. I could grind away the sides of the blade, but I wanted to wait and see how it performs first. If I was able to cut a clean rabbet with the way it was, I would just leave it alone.

SAMSUNG CAMERA PICTURES

Here she is after all the work has been done. It looks a lot better than the way I bought her, but I still needed to see if she works.

SAMSUNG CAMERA PICTURES

After setting the blade to the right depth, I tried it out on a scrap piece of wood. It cut nice little shavings with ease and can now be put in my arsenal of planes for use. Even though I spent a good day tuning this plane up, it gives me great satisfaction resurrecting an old tool back to life. Plus it saved me a ton of money versus buying a new rabbet plane.

SAMSUNG CAMERA PICTURES