Brimfield Antique Show

Last weekend, my wife and I drove to Massachusetts to go to the Brimfield Antique Show. We heard about Brimfield for years, but finally decided to take the plunge and drive out there to see it for ourselves. With 6000 dealers attending, we were excited to see the show.

20170512_094352

We drove to Connecticut the night before and woke up Friday morning at 5:00 am to drive up north to the show. We arrived into Brimfield around 7:30 am and the first thing we noticed was that it reminded us of a very large stop on the World’s Longest Yard Sale. Dealer tents were set up on both sides of the street which stretched down for nearly a mile. We came up to a gate where a few people were waiting until 8:00 am for it to open and noticed that there was a $5.00 entry fee to get inside. Given we had a half an hour wait, we walked across the street trying to see if any ther dealers were already open, but only a handful were.

About a half an hour later, we came back to the gate where a large group of people were now waiting. We thought to ourselves that this area must be the place to be, so we handed the attendants $5.00 and waited for the gates to open. As soon as they did, we saw people literally running in like it was a black Friday sale. Anita and I started laughing thinking what in the world could be inside the show area worth running for.

Once we got inside, we looked around to see what all the fuss was all about. There were plenty of dealers selling quality antiques, but they came with dealer prices. After about an hour of buying a few things inside, we went out to see what the other areas had to offer.

20170512_082104

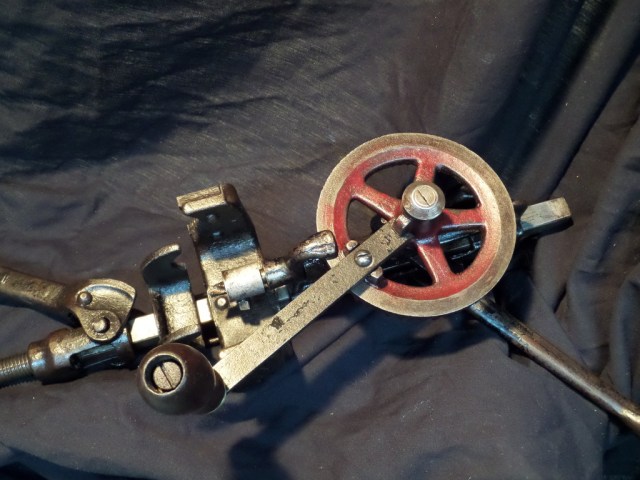
The majority of tools that I saw were being sold by collectors, so there was little opportunity to snag a good deal. I was hoping that since I was on the east coast, I would see a lot of good deals on old Stanley planes, but unfortunately that wasn’t the case.

20170512_081523

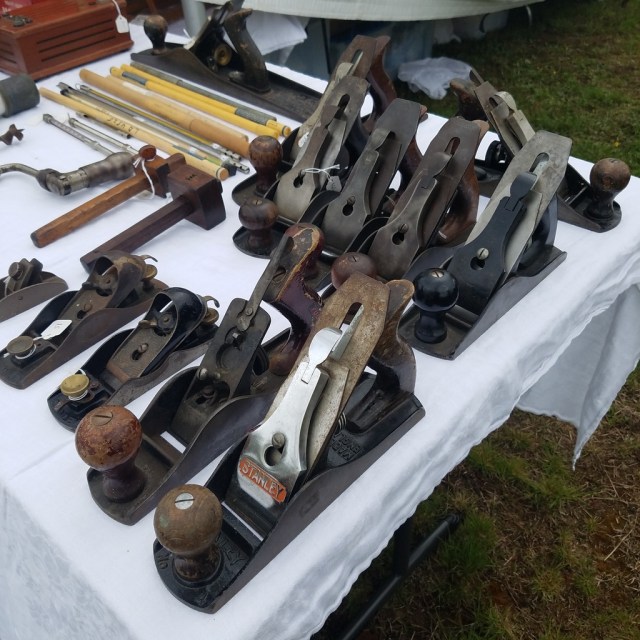
I used to think that all the old tools were on the east coast since that is where Stanley plant was located, but I now think tool collectors have all the old tools, not the east coast. It’s just getting harder and harder to find them in the wild for a good price. Most of the planes on this table were $40-85 in price. Even the broken casting block plane was $30.00.

img_20170513_185227_627

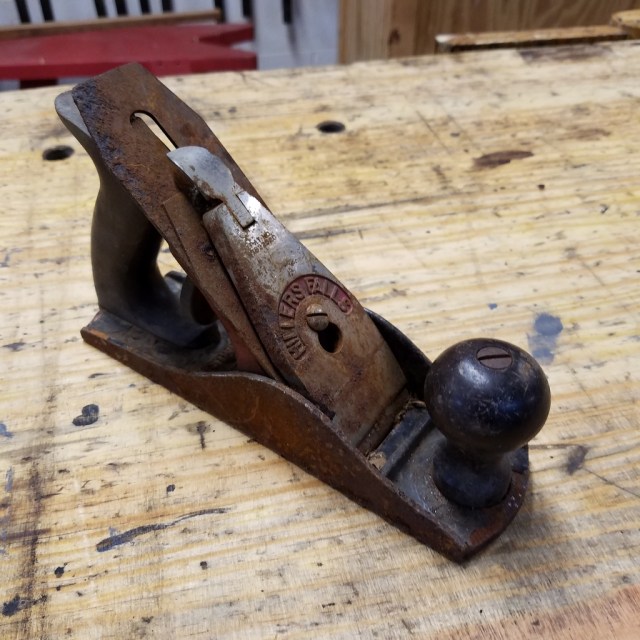
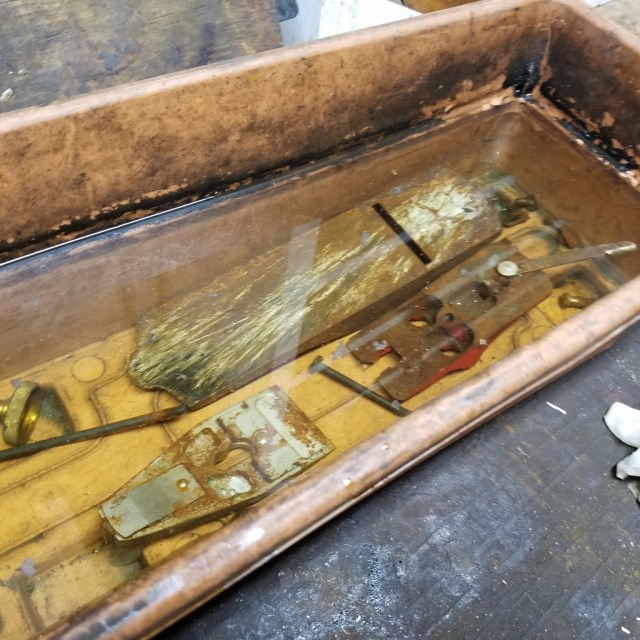
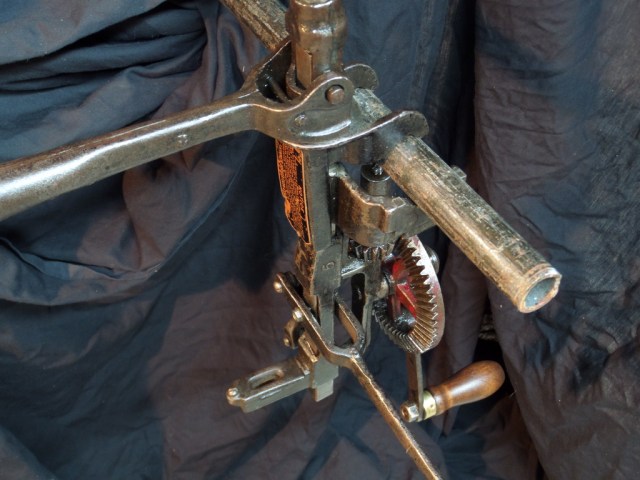
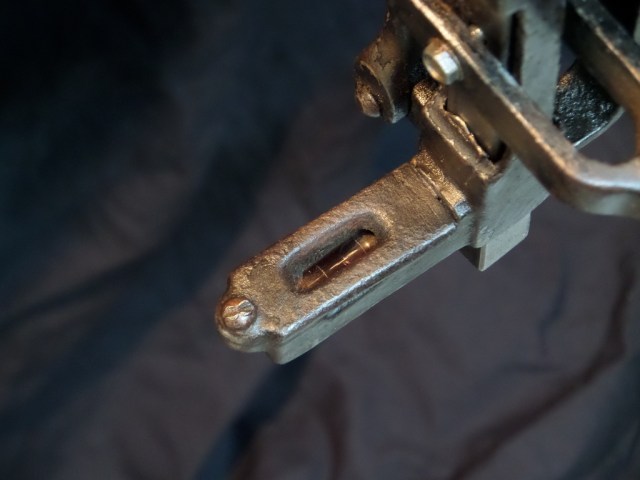
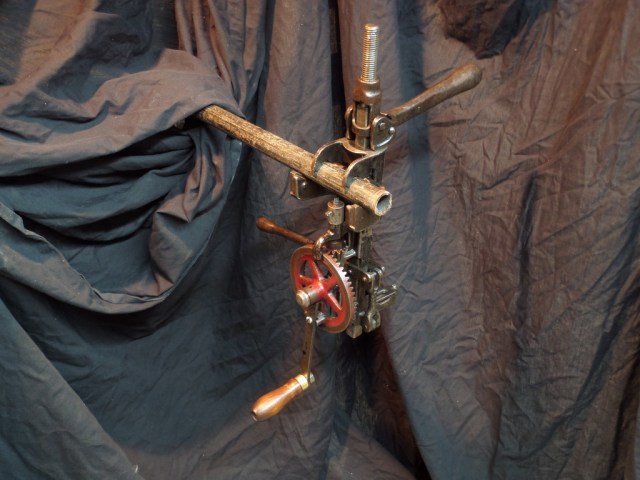
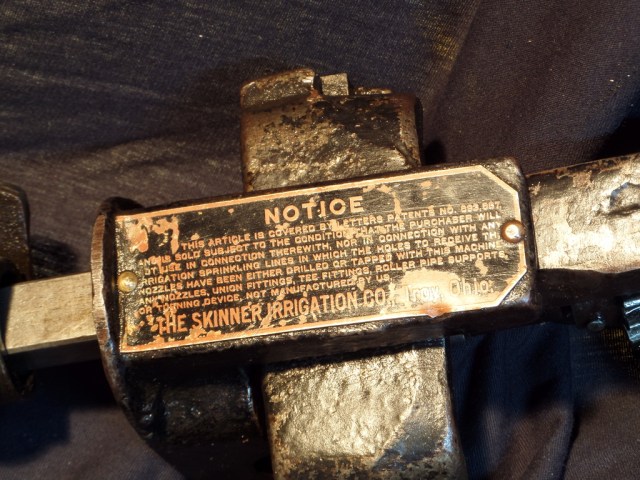
It’s impossible to see the whole show in one day, but after spending seven hours all over Brimfield we saw 80-90% of it. Unfortunately, these are all the tools I came home with. An old razee smooth plane, a Stanley No 4, a Ohio Tool Co No 4, a Wards Master No 7,  a Sargent block plane, an egg beater drill, and a turn screw. Not terrible, but I’ve done better. Anita faired better than me as she ran out of money and had to borrow mine. It was still a lot of fun and is definitely worth it, if it is on your bucket list.

20170514_152031


Saving a Millers Falls No 9 Plane

Last month my wife and I were at an antique show in Columbus, Ohio when I passed by this Millers Falls No 9 plane. I looked at it and decided that the rust on the right side was too much to deal with, so I walked away. About ten minutes later, something told me to go back and examine the plane better to see if it was worth saving. I thought to myself if nothing else, it could be used for parts as the handles and frog were in good shape. I asked the dealer how much he wanted for it and he told me $10.00 so I handed him a ten-dollar bill and walked away.

img_20170304_120015_038

The first thing I do when restoring an old plane is to take everything completely apart spraying PB Blaster on the parts if necessary to break free the rust.

20170304_121257

Once apart, I soak the plane in a citric acid bath for a few hours. I use an old planter box as my tub and fill it half way up with water. Then I’ll scoop out about a cup of citric acid and spread it over the water. Sometimes you can buy citric acid at the grocery store in the spices section, but I buy mine by bulk on eBay. I buy about ten pounds worth for $30.00 which is much cheaper than the grocery store which is usually about $7.00 per pound.

img_20170304_155902_905

After a few hours, I take the parts out of the bath and use a wire brush to scrub the residue off the parts. The acid does a great job of removing the rust from the tool.

img_20170305_101028_318

I then polish all the parts with sanding sponges and apply my own homemade rust protection solution which contains, mineral oil, orange oil, and beeswax. I also steel wool the handles of the plane and apply a couple of coats of shellac to them.

20170305_200606

Once everything is cleaned and polished, I put the plane back together to see how it looks.

img_20170305_202015_812

If all the plane was to do is to sit on a shelf and collect dust, then I would be done. However, I want this plane to be used again, so I needed to focus on the blade. As you can see in the picture, the blade was roasted and desperately needed a new edge. Some people feel a blade that is in this bad of shape would automatically need to be replaced, but I like to see if I can get it to work again first.

20170401_102354

I took the blade over to my high-speed grinder and ground a new edge making sure not to overheat the blade making it lose its hardness.

20170401_103001

After the major grinding was done, I switched to my slow speed water-cooled grinder and worked on the edge some more. I also flattened the back of the blade on my grinder at the same time.

20170401_104744

After I was satisfied with the grinding process, I switched to my water stones to hone the edge. I sharpened the blade with a series of 800, 2000, and 5000 grit water stones.

20170401_105348

I set the cap iron about a 1/8″ from the edge of the blade and put it back in the plane. After adjusting the blade up and down, I was able to get the plane to cut off a nice thin shaving.

20170401_105936

I took one of the shavings and measured it with my calipers. The shavings produced were .002 of an inch thick.

20170401_110035

The shavings are nice, but the real proof is the way the plane leaves the wood with a nice sheen. No sandpaper needed. Not too shabby for a rusty $10 plane.

20170401_110434

Inexpensive Window Trim

The windows in our house aren’t much to talk about. Just 36″ square vinyl windows in a typical ranch. I’m not sure how old they are as I know they aren’t original to the house, but were here when I bought it fifteen years ago. My wife, Anita, wanted to jazz them up a bit and give them some character, so she asked me to make trim to go around them.

20170312_105920

The first thing we did, was to take out the marble sill, which was the hardest part. Sometimes they get stuck inside the frame, so I had brake them apart in order for them to come loose. If I was lucky, I could cut the sealant around the sill and jimmy it loose.

20170312_105942

I made a new sill out of 7/8″ thick maple. I tried to get rift sawn material so it wouldn’t warp too bad. I cut notches on both sides of the sill so it would stick out on the wall so the 1×4’s could lay on top of it.

20170312_123610

We wanted the header to have character so we took a 1×6 of pine and attached a 1×2 on the top. We then laid a cove molding on the 1×6.

20170312_1235571

Using my small miter box, I was able to cut the tiny pieces of cove for the ends.

20170318_122351

I then took a piece of pine 1/2″ thick and used my block plane to shape the corners and ends to create a bullnose. I pinned everything together  with my 18 gauge pneumatic nailer to complete the header.

img_20170312_142516_891

Back at the window, I measured, cut, and nailed the rest of the pieces to the wall using a 15 gauge finish nailer. I trimmed the maple sill so that there would be a 3/4″ overhang to sides on both ends.

img_20170312_202015_986

Here’s the close up of the header nailed to the wall. The 1/2″ thick bullnose hangs over 1/2″ on both sides of the frame.

20170323_203246

After filling the nail holes with putty, Anita caulked, primed, and painted the window trim. We did both windows in our bedroom the same way. The next step is to frame around the closet, paint the room, get a new headboard, new blinds, ceiling fan, rug, etc… I don’t know, ask Anita, she’s the designer. haha

The Damaged Pinky

If you know me, then you know I don’t do woodworking for a living. I’m actually a sales rep for one of the largest building manufacturers in the country. I sell patio block, mulch, and concrete mix to Lowe’s and Home Depot’s in the Cincinnati, Dayton area. Unfortunately, I got hurt at work.

finger

Part of my job is to get my stores ready for spring by making patio hardscape displays on the shelves of the garden department. While in one of my Home Depot’s, I removed the old display and had to put a shelf in its place. In order to get the beam locked in place, I had to hammer it down so that the little nibs would lock in the hole properly. I got the right side of the beam hammered in place, when I was working on the left side. Being right-handed, I was using my left hand to hold the beam against the rack pushing it forward while swinging a 3 lb hammer with my right arm. Just as luck would have it, hammering across my body, I barely nicked my pinky finger with the end of the hammer. Had I not been swinging so hard, it would have just caused a blood blister, but because I was wailing at the beam with such force, the blow blew the tip of my pinky open. As soon as I felt it, I knew it wasn’t good, but I didn’t know how bad the cut was until I went to the bathroom to clean it up. Once there, I realized I had to go get stitches as I could I open up the top of my pinky finger.

hand

I traveled to a nearby hospital where they put five stitches in my finger. I also found out through x-rays that I broke my bone as well. I have to wear a splint for the next month. I always thought that if I ever cut one of my fingers open, it would be from a band saw blade,  chisel, or a knife. I never thought it would be from the brute force of a 3lb drilling hammer.

stitches.jpg

The stitches came out last week and I should be fine in about a  month. I’ll need to keep the splint on my finger as the bone heals, but it’s not a big deal. The protrusion of the splint from the top of my finger keeps me from hitting my pinky on objects. I take off the bandage everyday and clean the wound. You can see how much my finger has swelled from the blow. I feel stupid for hitting my finger, but it was more of an accident than anything.

img_20170304_110141_126

Another Dresser Turned Wine Cabinet

Last year my wife and I bought an old dresser at an antique show in Columbus, Ohio. We had a spot in our dining room we wanted to make into a bar area and the dresser was small enough that it would fit nicely in that spot.cabinet

I had to remove the drawers to make room for the wine bottle storage I was going to build so, I cut off the rail and drawer runners that were between the two drawers.

img_20170106_164811_784

The dresser was old and someone in the past tried to repair the case by driving nails through the side of the case into the end grain of the tenon. I took the tenon out and drove the nails back out through the side.

img_20170106_173116_056

After the nails were gone, I glued the case back together to make everything sturdy and square.

20170106_174530

The cabinet was going to be painted so, I bought some birch plywood and cut up pieces to make a box that would slide inside the case. I also trimmed the edges of the plywood with oak to match the rest of the case.

img_20170107_181424_519

The old dresser had a bit of detail to the rails that I wanted to match on the box I was building.

20170107_165751

I took my No 8 hollow molding plane and planed a shallow recess down the middle and rounded over the sides with my block plane.

img_20170108_125824_574_1

I had to carefully build the box to fit inside the case. It needed to be loose to slide in, but not too big that it wouldn’t fit. I made the box an 1/8″ smaller than the length and height of the opening of the case so that it would fit. I used simple rabbet joinery to join the sides together and a dado down the middle for the divider.

20170108_142721

The moment of truth. After building the box I prayed that it would slide in the case. Thankfully it did.

20170108_152110

My wife painted the case with black milk paint. She also sanded and stained the top and drawers with a gel stain. I then applied two coats of Waterlox varnish on the top and drawers.

img_20170112_160845_049

I wanted the left side to hold wine bottles so, I built diagonal grid out of solid oak and used dadoes for joinery so that the other side of the grid would slide through. This too had to be fitted carefully so that it wasn’t too tight to slide in. After everything fitted well, I took it out, stained and applied Waterlox varnish to the grid.

20170112_172051

Here’s the final cabinet sitting in the same spot. We removed one shelf as we felt the wine glasses hung a little too low. The cabinet came out well and was dirt cheap to build.

img_20170117_193246_265


Porter Cable Restorer

This week while traveling through the Lowe’s stores I call on, I stumbled upon this sander in the tool aisle. It’s called a restorer that uses a sanding drum to sand wood. It was originally $129.00, but Lowe’s had it on clearance for $69.00. I thought it was too good of a deal to pass up so, I bought the tool along with a box of 80 grit sanding sleeves and a paint removal wheel.

20170125_151922

I’ve seen a tool like this being used one day while watching This Old House. Norm traveled to a cabinet shop that builds furniture out of old barn wood. They were using a Makita wheel sander to sand away all the dirt and paint to give the boards a clean look without removing the character of the old wood.  I looked on Amazon to see how much the Makita costs and read the customer reviews. You can read about it here. Even though the Makita has a 7.8 amp motor while the Porter Cable only has 3.5 amps, both machines use 4″ drums, so I thought picking up this Porter Cable restorer for $69.00 was a steal.

20170125_152204

I grabbed a piece of old flooring and tried the tool out.The restorer comes with a variety of sanding grits, from 60-120 so, I slid on a 80 grit sleeve and gently placed it on the wood being careful not to put too much pressure on the machine so it would not dig in.

20170125_151958

After a few light passes, the wood was clean from dirt and grime. I even hooked up my shop vacuum to the restorer and very little dust, if any, escaped. The beauty of this tool is because it is a sanding drum, it slightly bounces off the surface following any irregularities in the wood. Had I used a belt sander to sand the board, the bottom plate of the sander would have flatten any of those irregularities away. After I was done sanding, the wood still had an old look, but was clean from dirt and grime.

20170125_152141

Impressed with its performance, I decided to clean off the top of my workbench. You can see the difference between the sanded surface with just one pass with the restorer. The tool even has variable speed so I can gauge how aggressive the drum will sand.

20170125_151933

You can buy a wheel to remove rust and paint from metal for about $12.00. When I use this wheel, I’ll make sure I won’t hook up the restorer to my shop vac. It’ll be just my luck that I’ll suck in a spark that will ignite the dust inside the vacuum bag creating a dust bomb. No thanks.

20170125_152232

Refurbishing a Dresser into a Wine Cabinet

Back in the summer, my wife bought a dresser from a couple in Kentucky on the Longest Yard Sale for $20. The dresser wasn’t in the best shape as most of the drawers were beat up , but we decided to buy it anyway because we knew we would be able to re-purpose it into something other than a dresser.

20170114_175247

We decided to turn the dresser into a wine cabinet so I had to remove the rails from the middle of the case. I grabbed my Fein MultiMaster and cut off the tenons that attached the rails to the frame.

20170114_182131

I cleaned up the middle of the case and strengthened the case where it needed with glue and clamps.

20170114_183046

The cabinet opening was 25 1/2″ square so I designed the inside to accommodate as many wine bottles as possible. I played with different measurements until I decided on 4″ square holes to fit the wine bottles.

20170114_192909

While building a couple of grids, I test fitted them to make sure they would hold a wine bottle without falling through. I made the grids from southern yellow pine and each bar is about 3/4″ square, 12″ long with a chamfer on the front.

img_20170115_131238_044

I built the rest of the grids and tested their fit again. The cabinet would be able to hold 25 wine bottles.

img_20170115_143857_253

Since the bottom of the cabinet was now open to the floor, I added a piece of 1/4″ plywood to the base of the cabinet.

20170115_163753

And because I added the plywood to the bottom, I had to trim a 1/4″ off the bottom to all my grids. Using my panel cutter and a hand clamp, I was able to cut all the grids to the same length.

20170115_163758

After test fitting everything together, all the grids came together nicely. I installed a 1/4″ piece of plywood to the back of the grids so that the wine bottle wouldn’t fall through the back.

img_20170115_165248_517

Satisfied with the grids, I turned my attention to the drawer and glued a new piece of wood to the bottom of one side as it was damaged. The drawer wasn’t opening smoothly so this repair helped out a lot.

20170115_173721

Because the grids were freshly cut wood, I wanted to age them to match the piece, so I brushed on an apple cider vinegar and steel wool solution to darken them up.

img_20170116_165959_411

My wife painted the inside of the case black and the outside grey with milk paint to let some of the original finish show through. She then stained the top with a gel stain and applied three coats of Waterlox varnish. This cabinet is now ready for years of use under its new life.

img_20170120_171649_577

The Skinner Irrigation Co Hand Drilling Device

I’m not sure how unusual tools find me, but another has landed on my lap. This time it was an odd-looking drill press. I spotted it in a local antique shop and knew it was some sort of drill press with its flywheel and depth handle, but it was a drill press like I had never seen before. I could tell it was for drilling through pipe because of the claw like clamping pads that could wrap around pipe after adjusting the bottom arm.

SAMSUNG CAMERA PICTURES

I brought the drill press home and after cleaning it up, I clamped one of my bar clamps across my workbench and attached the press to one end of the pipe.

SAMSUNG CAMERA PICTURES

After studying the press a little bit, it dawned on me that I actually clamped the drill press upside down. The arm clamps down on top of the pipe, then the user turns the flywheel while pulling up the depth adjustment arm drilling a hole.

SAMSUNG CAMERA PICTURES

I realized it was upside down because of a small level on the bottom of the press which guides the user to place the tool level.

SAMSUNG CAMERA PICTURES

Here’s another view of the press in its rightful state.

SAMSUNG CAMERA PICTURES


Luckily, there was a maker’s plate on the back. The tool was made by The Skinner Irrigation Co in Troy, OH. I googled the company name and found they were a turn of the century company that specialized in laying irrigation systems. Apparently this tool was used to tap into pipes to attach some sort of nozzles in a direct line with each other. Also, on the plate there was a patent number 893667 so I googled that as well. I found out that the tool was patented July, 21, 1908. You can read about it here. http://www.freepatentsonline.com/0893667.pdf\

SAMSUNG CAMERA PICTURES

The bit that came with the tool looks like a broken threaded tap. You can see that the collar doesn’t have a chuck so this must be a very specialized tool to do one specific job.

SAMSUNG CAMERA PICTURES

Who knows how many of these hand drilling devices were made, but I’m glad this one found me.

SAMSUNG CAMERA PICTURES

Building a Shed Part XII

While browsing through the Weaver Barn catalogue, Anita saw this cool looking arbor over a couple of doors. We decided that an arbor like this would look really nice over our side window.

 photo 20161022_120709.jpg

To begin construction on the arbor, I grabbed some scrap cedar I had from building the shed and made about 24 slats. The slats were about 1  3/4″ wide by 13″ long with a little 1″ arch at one end.

 photo 20161022_115046.jpg

Designing simply from a picture can be tough, so I grabbed a scrap piece of 6″ wide cedar, cut out a 4″ diameter arch and placed it around my corbel to see how to design the overall arbor.

 photo 20161022_121136.jpg

The distance between the corbels is 6′ with the overall length of the arbor being 87″. I originally planned 25 slats about 3 1/2″ apart, but Anita thought it was a little too many slats.

 photo 20161022_144036.jpg

We ended up deciding to use 21 slats 4″ apart. I wanted the slats to fit in place so I cut some dadoes in the wood to house the slats. Using  my dovetail saw, router plane, and rasps, I easily cut the dadoes in no time.

 photo 20161023_131336.jpg

I cut a small dado on each of the slats as well and test fitted the arbor together.

 photo IMG_20161023_130104.jpg

Since the slats had a dado, I decided the corbels should have dadoes as well to keep everything in line.

 photo 20161023_111052.jpg

I also wanted the arbor to fit inside the corbels so I cut notches in both the front and back where the corbels would go.

 photo 20161023_115614.jpg

I fit everything back together and drilled the slats to fit on the front and back. I used stainless steel screws so that they wouldn’t stain the arbor like galvanized screws would.

 photo 20161023_133945.jpg

Dry fitting everything together the arbor started to come together nicely, so it was time to stain it.

 photo 20161023_134513.jpg

I stained the arbor the same Benjamin Moore Cedar Bark stain we used on the shed.

 photo 20161023_145637.jpg

However, after living with the color of the stain on the shed for a few weeks, we weren’t too happy with the color. So, after the first coat of Cedar Bark from Sherwin Williams, Anita mixed in a pint of Leather Saddle Brown with a touch of Fresh Brew stain from Benjamin Moore. Since all three stains were water based, they mixed together well.

 photo 20161027_152844.jpg

After I applied the new coat, the cedar took on a much warmer color. We were very pleased.

 photo 20161027_152903.jpg

Anita helped me install the arbor so I don’t have any pictures of it being installed as I wasn’t in the mood to tell her to hold onto the arbor while I stop and take some pictures. I started out measuring the length of the window frame and calculated how much on each end the corbels would need to be in order for the arbor to be in the middle of the window. The window frame was 67″ while the distance between the corbels was 72″. That left me with 2 1/2″ on each side of the window. I marked the spot and then decided how far above the window I wanted the arbor to be. Once I got that measurement, which was 2 1/2″ as well, I nailed the left corbel in place with 2 1/2″ galvanized pneumatic nails. Then, I placed the arbor on top of the corbel, leveled it, and then shot nails in the arbor itself, attaching it through the siding into the studs of the shed. I then screwed my stainless steel screws through my pocket holes attaching the arbor to the corbel to tighten everything up. Next, I took the right corbel and stuck it up into the recess of the arbor, nailed and screwed it up just as I did to the left one. Finally, I screwed and nailed the back side of the arbor to the shed.

 photo IMG_20161030_155615.jpg

As you can see, I think we made a good decision darkening the cedar stain. The cedar looks richer and blends better with the gray paint.

 photo IMG_20161031_100223.jpg

The Workshops of Biltmore

Last week, my wife and I went to the Biltmore Estate again for the fourth or fifth time. If you’ve never been there, there’s a little village on the estate where you can visit a farm, workshops and the ever important winery. Every other time we’ve been to Biltmore, we spent too much time at the house and the winery that by the time we arrived at the village, the workshops were closed. This year we decided to see the village before we headed inside the winery.

20161018_172504

I took some quick shots of the blacksmith shop and the tools they use. After I took these pictures, the blacksmith came back and showed us how he made coat hooks with a rose on the top (sorry, no pic). It was late in the day, so all the anvil work was done, he was simply polishing them up on a wire wheel. Biltmore sells these coat hooks in their gift shop for $42.00 each, but they sell as soon as he’s done making them.


If you’ve never used a blacksmith vise, you need to get one. I use on in my workshop and they are far superior than a table top machinist vise.


Not sure of the weight, but it looks like a 300 lb anvil. He had a smaller one in his shop right next to this one.


The overall working space of his shop was about 10′ x 15′


Right next door to the blacksmith shop was the woodworking shop.


Inside was a bunch of tools I’ve seen before except for this cool little foot powered mortise machine.


The woodworker wasn’t around so I don’t know what his responsibilities are for Biltmore. He could just make things for the gift shop, or he may do some repair work around the estate.


The majority of the tools were old, but he did use electricity. I couldn’t really see what was inside the tool chest on the right.


By the looks of these planes, I question whether or not he uses them, or if they are there just for show. A little too much dust and cobwebs on them for my taste.


A newer lathe sat in front of the older one. He spent his day making these turn of the century ball in the cup toys.


If you ever get a chance to go to the Biltmore Estate, make sure you give yourself enough time to visit the village before you head into the winery and get drunk like we did. haha